Posts

Showing posts from 2013

Lenovo g580 wired connection solved

Step1:Download the drivers from the following link: http://linuxwireless.org/download/compat-wireless-2.6/compat-wireless-2012-05-10-p.tar.bz2 Step2:tar -xvf compat-wireless-2012-02-28-p.tar Step3:cd compat-wireless-2012-02-28-p Step4:scripts/driver-select alx Step5:make Step6:make install Step7:modprobe alx

Python program for factorial using recursion

# Factorial recursion program def fact(n):     if(n==1):         return 1     else:         return n*fact(n-1) number=input("\n Enter the number") result=fact(number) print "the factorial of",number,"is ",result

Python program to print fibonacci series

#python program to print fibonacci series f1=0 f2=1 i=0 print f1 print f2 while i<7:       f3=f1+f2     f1=f2     f2=f3     print f3     i=i+1

Python program to print factorial of 2 or 3 digit number

#program that print the factorial of a 2 or 3 digit number user=input("\n enter 2 or 3 digit number") if(user>999):     print "Enter only 2 or 3 digit number" else:     sum=1     number=1     while user>=number:         sum=sum*number         number=number+1     print "the factorial of the",user,"is",sum

Pythom Program to get the sum of digits of 5-digit number

#sum of five digits of the num number=input(" Enter the 5 digit number") if number<9999 and number>99999:     print "Enter 5 digit number only"   else:     sum=0     while(number>0):         rem=number%10         sum=sum+rem         number=number/10     print "the sum is ",sum

Python Program to Know whether a year is leap or not

#program to check whether the year is leap or not year=input("\n enter the year to check whether it is leap or not") if year%4==0 and year%100!=0 or year%100==0 and year%400==0 :     print "",year," is a Leap Year" else :     print "",year ,"is Not a Leap Year"

C-Program for calendar

#include<stdio.h> #include<stdlib.h> #include<math.h> int leap(int year) //if leap year we have to reduce one day { if((year%4==0&&year%100!=0)||(year%100==0&&year%400==0)) return -1; return 0; } int main(int argc,char *argv) { char *date=(char *)malloc(100); int day; int month; int year; int temp; int century[4]={4,2,0,6}; int centurycode; printf("\n enter the date,month and year in the following format"); printf("\n dd/mm/yyyy"); scanf("%s",date); sscanf(date,"%d%*c%d%*c%d",&day,&month,&year); /* Error Checking*/ if(month>12 || day >31) { printf("in valid date"); return; } if(month==2) { if(leap(year)&&day>29){ printf("invalid date");return;} if(day>28){ printf("invalid date");return;} } if(month==4||month==9||month==6||month==11) { if(day>30){

Calculate the day for the particular date given

How to calculate which day it  is for a given date There are two codes Month and Year Code Month Code: JAN-->0 FEB-->3 MAR-->3 APR-->6 MAY-->1 JUN--->4 JUL--->6 AUG-->2 SEP--->5 OCT--->0 NOV--->3 DEC---->5 Year Code 2064: 2--->1800--1899 0--->1900--1999 6--->2000--2099 4--->2100--2199 if we want for more than 2200 then same thing 2-->2200--2299 and so on if we want for 1700--1799 go in reverse order 2--->1400--1499 0--->1500---1599 6-->1600--1699 4--->1700--1799 Add the date + last two digits of the year+last two digits of the year/4  +month code + century code Divide by 7 and take the remainder remainder-->0-->Sunday remainder-->1--->Monday remainder--->2--->Tuesday remainder--->3---->Wednesday remainder--->4---->Thursday remainder--->5---->Friday remainder---->6---->Saturday I will explain with example 15-08-1947 date=15

How to port wheezy image on SD-Card in Ubuntu

Step1: Insert the SD-Card into the PC or Laptop Step2:Check where it is mounted.You can use df utility which gives the information about the file system or use dmesg to know.Basically /dev/sda will be used by the harddisk.So,if you dont have pendrive connected it will be in /dev/sdb. Syntax:df -h Step3:Download the Image and unzip is you will get a wheezy.img Step4: Use a utility called dd(Disk to Disk Copy) for copying the image on the SD-Card Step5: sudo dd if=filename.img of=/dev/sdX bs=1M sudo--->Permissions to write onto the SD-Card dd------>disk to disk copy if------->input file of------->output file bs------>Block size Thats it

Mounting a USB drive on Raspberry Pi

Image
When you connect a pen drive to a linux distribution it automatically gets mounted but not in the case of raspberry. You have to manually mount it. Lets check the procedure for it. Step1: Insert the SD-Card to the pi and power it. And connect via ssh Step2: Connect the USB drive in the USB -Slot Step3: Type dmesg . And check where it is mounted. By default it will be mounted to sda .If not then to sdb. Step4: Create a folder in /media mkdir /media/USB Step5: Now mount the USB drive to this folder sudo mount /dev/sda /media /USB Step6: Now you can access the USB drive from this folder

LEDS Information On Raspberry Pi

Image
Raspberry Pi Model has five status Leds  .Each has its own purpose ACT--->GREEN--->Indicates the SD Card is present PWR--->RED------>Indicates 3.3V power is applied FDX ---->GREEN--->Full Duplex LAN is connected LNK---->GREEN--->Some Activity over the Link is going on 100------>YELLOW-->100Mbit LAN is connected

How to check power supply status of raspberry pi

Image
To accomplish this Items required: 1.Raspberry Pi 2.Multimeter 3.Good Micro USB Charger for power supply Connect charger to the power supply and on the pi. In order to test the power supply status keep the multimeter in DC 20V range and connect between TP1 and TP2 pins

How to rename the raspberrypi

 Raspberrypi comes with default name as "raspberrypi".  Suppose if you want to change it to some other name Step1: Connect to raspberry pi with ssh ssh pi@192.168.1.10 Step2: open the /etc/hosts file sudo vi /etc/hosts or sudo nano /etc/hosts change the raspberrypi to the name which you want save it Step3: open the /etc/hostname file sudo vi /etc/hostname or sudo nano /etc/hostname change the raspberrypi to the name which you want save it Step4:reboot to apply the changes sudo reboot Step5: Now open the raspberrypi again with ssh. Now you will see the name which you gave in place of raspberry pi

Raspberry Pi LX Terminal Commands

Image
1. To shutdown Raspberry     sudo shutdown -h now h->indicates halt after this you can remove the power from the pi 2. To reboot the Raspberry     sudo reboot 3. To change the password of  the raspberry     passwd 4. Running Configuration Window of RaspiBerry sudo raspi-config 5. Check the IPAddress of the RaspberryPi sudo ifconfig 6. Play Video via command-line. omxplayer filename Will be updated with more commands

How to access Raspberry GUI remotely in ur laptop

Image
This post assumes that you have already assigned a static ip to your raspberry. If not follow this post Using Raspberry Without monitor using ssh First you need an Internet Connection on your raspberry to install vnc server. Connect the rj45 from your pi to router and as your laptop is also connected to the router through wifi. You can access pi through ssh Open pi Step1:ssh pi@192.168.1.5 Step2:Open the following file:      sudo nano /etc/resolv.conf  and add the dns server of the router eg:nameserver:208.67.222.200 Step3:sudo apt-get update This is required as the repository information may be incomplete. Step4: Now you can access internet on your pi. So download the vnc server sudo apt-get install tightvncserver Step5: run it /usr/bin/tightvncserver first time it asks for password.give any password.. Step6: On your linux install sudo apt-get install xtightvncviewer Step7:Now you can access your pi GUI remotely xtightvnc

Using Raspberry Without monitor using ssh

Image
Step1: Download wheezy image from  http://www.raspberrypi.org/downloads Step2: In order to install this image into SD card use win disk manager in windows.Open the windisk manager and give the path of the image and click on write Now put the sd-card into raspbery pi and connect to the monitor and on the supply.here u enable ssh Step 3: Open the file system in ubuntu or any linux versions and go to /etc/network and open the interface file                sudo nano  /etc/network/interfaces You will get a screen like this In the above he is using dhcp to get the ip. lets make the ip static Step4: Write in the file following         change the iface eth0 inet dhcp to iface eth0 inet static           and add auto eth0 after auto lo and add the following libes after iface eth0 inet static addr 192.168.1.4 netmask 255.255.255.0 gateway 192.168.1.1   Step5: Now Connect the SD-Card to the Raspberry Pi and connect RJ-45 cable from raspberry

simple usb driver in linux

#include<linux/module.h> #include<linux/init.h> #include<linux/usb.h> MODULE_LICENSE("GPL"); /* When the device is inserted into the USB bus and the vendor id and product id matches with the driver registered in the core,the probe function is called.The usb_device structure,interface number and interface id are passed to the function */ static int toshiba_probe(struct usb_interface *interface,const struct usb_device_id *id) { printk("\n In probe function"); return 0; } /* This function is called whenever the device is removed from the USB device */ static void toshiba_disconnect(struct usb_interface *interface) { printk("\n In disconnect function"); } /* struct usb_device_id  structure provides a list of different types of USB devices that the driver supports */  static const struct usb_device_id usb_table[] = { { USB_DEVICE(0x13fe,0x1d00) }, { }, /*Terminating entry*/ }; /* To enable the linux hotplu

Pen-drive read only system error ubuntu

 Pen-drive is saying Read-only FileSystem whenever we are coying some thing in ubuntu In order to solve this error just type this command in command line dosfsck -a -v /dev/sdc /dev/sdc is the place where your pendrive is present. You can get it by typing dmesg|tail Now you can cut,copy,paste anything in your pendrive

ssh: connect to host 10.242.10.223 port 22: Connection refused

ssh: connect to host 10.242.10.223 port 22: Connection refused if you get an error saying this then check this command $:pgrep sshd if you get any number(PID) like 7293 any number then it means sshd is working If you dont get any PID or number then it means sshd is not installed ..go to synaptic package manager and check whether the packages are installed or not openssh-server(it is required if you want to send a file from other system to ur system) openssh-client(it is required when you want to send a file from your system to others system) ssh

PERL program which takes input from the user

#!/usr/bin/perl print("enter the name please"); $name=<STDIN>; print("Mr $name \r\bthanks for entering your name "); When the perl interpreter sees a statement , it breaks the statement down into smaller units of information. In this example $name,=,<STDIN>,; are the smaller units of information...these smaller units of information are known as tokens. The first token $name is an example of scalar variable.in perl, a scalar variable can store one piece of information.. The = token called the assignment operator tells the perl interpreter to store the item specified by the token to #the right of the = in  the place specified by the token to the left of the = The <STDIN> represents a line of input from the standard input file...The STDIN contains everything you enter when running a program..The <STDIN> tells the perl interpreter to read one line from the standard input file. The ; token at the end of the statement is a special

Routing in 6LoWPAN

Image
Transmission of IPV6 packets over LoWPAN devices was considered nearly impossible once because the MTU of IPV6 packets is 1280 bytes which is much larger than the MTU of IEEE 802.15.4 data link layer (127 bytes). So 6LoWPAN implements an adaptation layer between data link layer and network layer to support transmission of IPV6 packets over 802.15.4 . Main purpose of the adaptation layer is to fragment and reassemble the IPV6 packets. Routing in 6LOWPAN can be divided into two categories based on the decision taken either on adaptation layer or on the network layer. If the routing decision is taken under the adaptation layer it is Mesh Under. If the routing decision is taken on the network layer it is Route Over. Mesh Under:           In mesh under scheme, routing and forwarding are performed at link layer . To send a packet to a particular destination,the EUI 64 bit address or the 16 bit address is used and sent to the neighbour node  so that it can reach to the desti

Steps in Running an 8051 program

Steps in Running an 8051 program Step1: Use an editor to type a program.The program or the source file may have an extension .asm or .src it depends upon which assembly you are using Step2: The asm source file is fed to an 8051 assembler which converts instructions into machine code. The output is object file(.obj) and list file(.lst) Step3: The linker takes one or more object files and produce an absolute object file with extension abs Step4: Next the abs file is fed into a OH program(object to Hex converter) which creates a Hex file that can be burnt into the ROM.

How to run a .jar file in Linux(ubuntu)

To run a .jar file first make sure that latest version of java is installed. To check the version of java type java -version in command line To run a jar file type in command line java -jar filename.jar

LINK ESTIMATION EXCHANGE PROTOCOL: (LEEP)

In-bound link quality:In-bound link quality is a value in the range of 0 to 255 that descries the quality of link from A to B estimated by B by counting the packets which are successfully receuved among all the transmitted packets. For calculating the bidirectional link quality ,the in-bound link should be exchanged among the neighbours.LEEP frame includes a sequence number that will be incremented for every outbound.It will be incremented even when it is retransmitted. Nodes receiving the frames use those sequence numbers and a small cache to determine the quality of in-bound link. Each frame also includes inbound link quality for each of the sender's neighbours. Receiving nodes may use that (outbound quality) combined with the inbound quality that they have calculated from the neighbour's sequence numbers to determine the bidirectional quality.

TinyOS code to set a Node as Root

According to a collection protocol a node has four roles : producer,consumer,snooper and in-network processor.Consumer is the root. To set the node as the root the TinyOS code is Node_RootC.nc module Node_RootC { uses interface Boot; uses interface Leds; uses interface RootControl; } implementation { event void Boot.booted() { call RootControl.setRoot(); if(call RootControl.isRoot()==TRUE) call Leds.led0On(); } } Node_RootAppC .nc configuration Node_RootAppC { } implementation { components MainC,LedsC,CollectionC,Node_RootC; Node_RootC.Boot->MainC; Node_RootC.Leds->LedsC; Node_RootC.RootControl->CollectionC; } Here RootControl.setRoot() command is used to set the node as Root and RootControl.isRoot() commands returns a boolean value. It returns TRUE when the node is root . It returns FALSE when the node is non-root.

HOW CTP WORKS?

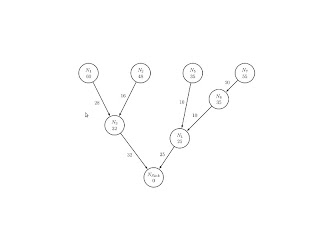
Image
The Collection Tree Protocol is a routing protocol used by wireless sensor networks.It is used for transferring data from sensors to the root node.The protocol tree creates a collection tree shown below: The bottom node is called the root,or sink node,which means that all the data is sent downwards in the tree to the root. The nodes N1 to N7 can simply forward packets or can creates their own data. The most important part is that all the information is sent towards the root,no matter which node sends it. Each node has a name and an expected transmission coefficient(ETX) to the sink. Each node will give the link quality value to its neighbour nodes.ETX is established by estimating the quality of links between the nodes and assigning a value to it.Adding the values of links between the sink and node gives the ETX of the node. Since each node calculates its own ETX a node only needs to know the link quality to the parent and the ETX of the parent in order to

Single-ended v/s Differential inputs

Most data acquisition systems provides two types of input connections:single ended and a differential input connection. Lets see what is the difference between the both. Single-ended inputs In single ended inputs we connect one wire from each signal source to the data acquistion interface.The measurement is the difference between the signal and ground at that interface. Advantage: Less number of wires required. Disadvantage:It suffers from noise injection.Noise can be introduced into the signal. Differential-ended In differential input,two wires from each signal source is connected to the data acquistion interface. One goes to a + input and one goes to a -input.The measurement is the voltage between two individual inputs within a common mode range. Advantage: Noise is removed. DisAdvantage: More number of wires are required.

What is Payload? in Networking

We often hear the word payload most commonly in networking... Packet  consists the data and header..Payload is the essential data that is carried by the packet after ignoring the overhead...In other words payload is the actual data that is sent to the destination....

Error in IRIS Mote -solved

If you get any error like when you are installing blink program on iris avrdude: safemode: efuse changed! Was ff, and is now f7 Would you like this fuse to be changed back? [y/n] y solution: vi /opt/tinyos-main/support/make/iris.target add in this : ifeq ($(PROGRAMMER),avrdude) PROGRAMMER_PART ?= -pm1281 -U efuse:w:0xff:m endif afterwards: ifeq ($(PROGRAMMER),avrdude) PROGRAMMER_PART ?= -pm1281 -U efuse:w:0xf7:m #PROGRAMMER_PART ?= -pm1281 -U efuse:w:0xff:m endif 

Creating a New Platform in TInyOS

What is aTinyOS Platform?     A physical platform is comprised of a set of chips. Similarly a TinyOS platform is nothing but  collection of components representing these chips(drivers of the chips).. How to create a New Platform?   If the chips of the new platform are already present in the exixsting platform then implementing a new platform simply means wiring existing components. If the chips of the new platform are not present in any existing platforms then implementing the new platform consists of implementing components (drivers) for those chips and then wiring them. Things Required For a New Platform:     A new platform definition requires three things: Defintion of chips that creates the platform Definition of the Platform(Combining chips to platform) and Tool Chain or make definition Chips Defintions:(tos/chips/chipX)     Each chip will be assigned a specific directory under tos/chips.    Each of the chips that provide software accessible fu

Booting Process in TinyOS

In our programs we always be wiring in our configuration file Boot interface to MainC component.Boot->MainC.Boot; So from this MainC is the component which is providing the Boot Interface. But when you look at the code in the MainC component. You will find that Boot=RealMainP. It means whenever you call MainC.Boot it automatically goes to RealMainP.Boot.. It means that RealMainP  signals the event booted() of the Boot interface. Now we will see what are the steps before it signals the booted() event of Boot interface. Step1: Platform_bootstrap();           call Scheduler.init(); Here he is initializing the scheduler so that any components can posts tasks and initializing all the other hardware related stuff. Step2: call PlatformInit.init();        while(call Scheduler.runNextTask()); Initializing the platform. Then spinning on the scheduler to check whether all the tasks are completed. If all the  tasks are completed runNextTask() will return FALSE . Step3: call Sof

Difference between Maskable and NonMaskable Interrupts

Maskable Interrupt:  An Interrupt that can be disabled or ignored by the instructions of CPU are called as Maskable Interrupt. Eg: RST6.5,RST7.5,RST5.5 OF 8085 are maskable Interrupts. Non-Maskable Interrupt: An interrupt that cannot be disabled or ignored by the instructions of CPU are called as Non-Maskable Interrupt. Eg:Trap of 8085

Princeton Architecture v/s Harvard Architecture

There are two fundamental architectures to access memory..Princeton and Harvard. Princeton Architecture: It has a single memory which has to be shared by data and code(program). Processor requires two clock cycles,one for fetching the code and another for fetching the data. Simpler Design.. Harvard Architecture: It has separate memories for code and data. Processor requires only one clock cycle as it has separate buses to access both data and code. Complex Design. If speed is required we will go for Harvard,otherwise it is better to go for Princeton Architecture.

How to change folder icon in ubuntu

How to change the folder icon in ubuntu?? Step1: Right Click on the folder whose icon you want to change. Step2:Click on the properties Step3:Under the Basic Tab click on the folder icon's image.Now it will open you select custom icon window. Step4: Go to the /usr/share/icons and select the icon which you want Step5:close the properties folder

Routing Methodologies in Networking

Routing methodologies commonly used in networking are unicast addressing,anycast addressing,multicast addressing and broadcast addressing.... Unicast: It is assigned to a single network interface..Packets sent to a unicast address are to that specific interface only.... Anycast : It is assigned to a group of interfaces. Packets sent to a Anycast address are sent to the nearest interface in that group... Multicast: It is also assigned to a group of interfaces..Packets sent to a Multicast address are sent to all the interfaces of that group.. Broadcast : Packets sent to a Broadcast address are sent to all the interfaces in that link...

TinyOS Syntax Highlighting with gedit

If  you want the gedit to show some colours when you are writing a TinyOS/NesC program follow these steps Download the nesc.lang file from the site http://sourceforge.net/projects/nescplugin/files/ and copy it to /usr/share/gtksourceview-3.0/language-specs/

How to get User Input from User in java??

program to get User Input in java import java.util.Scanner; public class UserInput { public static void main(String args[]) { Scanner obj=new Scanner(System.in); int number; String str; float f; System.out.println("Enter the String? :"); str=obj.nextLine(); System.out.println("You have entered the string:"+str); System.out.println("Enter the number ?"); number=obj.nextInt(); System.out.println("You have entered the number:"+number); System.out.println("ENter the float number"); f=obj.nextFloat(); System.out.println("YOu have entered the float value:"+f); } } java.util has a class named “scanner” which is used to read different types of values from users. Scanner obj=new Scanner(System.in); In this statement Scanner is the class name,obj is the Object of the Scanner class and System.in is the input stream. str=obj.ne

What is state of art??

What is state of art?? Many people used to say you have to know the state of art...so i try to find what is actually state of art.. According to wikipedia:         It defines it as the level of knowledge and development achieved in a technique,science.... In other words it is also defined as staying with the up to date knowledge in order to make advancements in the already existing knowledge....

CPSR For ARM7

Image
First Five Bits are used to select the one of the modes.

Hardware Abstraction Architecture of TInyOS

Hardware Abstraction Architecture of TInyOS The Hardware Abstraction Architecture of TinyOS has three layers.. 1. Hardware Presentation Layer : It is the lowest layer. It provides the lowest level access to the hardware, and provides wrappers around lowest level tasks,such as setting registers with higher level software calls. Components in this layer are not expected to be used from user program as any functionality they provide should be exposed by higher levels above it. Components should be efficient,because many higher level components may call it simultaneously. 2.Hardware Adaptation Layer: It is above the Hardware Presentation Layer. Contains most of the platform code. Exposes one or more components for each piece of functionality the mote provides. HAL components provide advanced functionality of the program at the expense of programs using them become platform-specific. 3.Hardware Interface Layer: The

My First perl program

My First perl program: Create a file with filename.pl #!/usr/bin/perl print "Hello World.\n"; First Line: Every program starts with this line..It is the perl interpreter and will vary from system to system ... To Know about your interpreter type in command prompt $which perl Second Line: It is used to print the Hello World on the screen.. To execute type in command prompt $perl filename.pl

MOTE -PC COMMUNICATION in TinyOS

MOTE -PC COMMUNICATION in TinyOS STEP1:Install the TestSerial Application on your mote. The application sends a packet over the serial interface for every second,and when it receives a packet it displays the binary equivalent over the LED's. STEP2:Once you have installed application on the mote.we need to run the corresponding java application to communicate with the serial port. This is build when we install the application on the mote. From the application directory type java TestSerial<-' If you get an error like sf@localhost:9002 died - exiting (java.net.ConnectException: Connection refused) It means you have not specified the serial port as source you have to specify in the syntax Type export MOTECOM=serial@/dev/ttyUSB0:telosb for telosb mote. STEP3: Now when you type java TestSerial <-' , you will get output like Received packet sequence number 317 Sending packet 1 Received packet sequence number 318 Sending pac

C-language 63 programming Questions

C-language 63 programming Questions 1. What are storage classes in 'C' language? a)auto keyword b)static keyword c)register keyword d)extern keyword e)automatic f)static 2. What are the storage class specifiers in c language? 3. How many variables scopes are there in c language? 4. main() { int i; for(i=0;i<5;i++) { static int a=0; int b=0; a++; b++; printf("\na=%d",a); printf("b=%d",b); } } 5. main() { static int s; ++s; printf("\n%d",s); if(s<=3) main(); printf("\n%d",s); } 6. extern int a; main() { printf("\na=%d",a); return 0; } 7. int a; main() { printf("\na=%d",a); return 0; } 8. extern int a; main() { printf("\na=%d",a); return 0; }int a; 9. extern int a; main() { printf("\na=%d",a); return 0;

c-language 97 programming questions

c-language 97 programming questions 1. #include<stdio.h> void main() { printf("%d%d%d\n",50,100); } 2. void main(){ a=3.5; printf("%d",a); } 3. void main(){ printf(%d%d",100,200,300); } 4. void main(){ printf(2+3=%d",2+3); } 5. void main(){ int a; a=3+5*5+3; printf(%d,a); } 6. void main(){ int a; a=printf("sumit%d",printf("sumit)); printf("%d",a); } 7. void main(){ printf("%d",%d",47%5,47%-5); printf("%d%d%d",-47%5,-47%-5,5%7); } 8. void main(){ int a; float f; a=12/5; f=12/5; printf("%d%f",a,f); } 9. void main(){ int a,b; a=b=100; scanf("%d%d",a,&b); //enterde value are 40,85 printf("%d%d",a,b); } 10.