Posts

Showing posts from February, 2019

Disabling root SSH login over network in Yocto

Image
One of the security measures we can take in our Yocto Image is to avoid root user login over SSH. The SSH server which gets installed on the image with core-image-sato is 'dropbear' To avoid root login over SSH, you need to remove 'debug-tweaks' EXTRA_IMAGE_FEATURES="" With 'debug-tweaks' option enabled, Yocto runs with dropbear with -B option. -B Allow blank password logins To avoid root login over SSH, we need to pass the following options to dropbear -w Disallow root logins -g Disable password logins for root dropbear recipe is present in 'poky/meta/recipes-core/dropbear/'. The 'init' file present in dropbear folder is the script which runs on boot. We need to add '-wg' option in DROPBEAR_EXTRA_ARGS To achieve this: 1. Create recipes-core folder if it doesn't exist in your layer 2. Inside that create dropbear folder 3. In it create files folder 4. Copy the original init file a...

Setting password for root user in Yocto

Image
By default, if you have not made any modifications to 'EXTRA_IMAGE_FEATURES' variables, "debug-tweaks" option is set. $ bitbake -e rpi-basic-image | grep ^EXTRA_IMAGE_FEATURES EXTRA_IMAGE_FEATURES="debug-tweaks" This option makes the image suitable for development and allows you to have an empty root password. So, if you have ssh server running, you no need to type the password. But for production, this is not a good idea, as it is insecure. We need to add a password for the root user. We need to remove "debug-tweaks" option from the EXTRA_IMAGE_FEATURES. Add the below line in your local.conf or machine.conf file EXTRA_IMAGE_FEATURES="" To add the password for the root account you can write the below in your local.conf or machine.conf file: INHERIT += "extrausers" EXTRA_USERS_PARAMS = "usermod -p $(openssl passwd 123456) root The problem with the above approach is any developer can look at th...

Display format/color text on the shell

Image
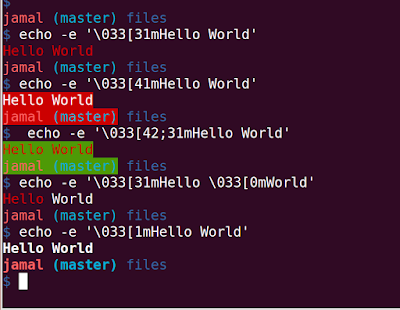
Terminals can display texts in color as well as allow formatting with the help of escape sequences. Escape Sequence = Escape Character + FormatCode+'m' = "<esc>[FormatCodem" Escape character can be '\e', \033, \x1B The format code for Red is 31, so to print the Text in Red. echo -e '\033[31mHello World' The -e option of the echo command enable the parsing of the escape sequences. If you want the background to be Red the format code is 41. echo -e '\033[41mHello World' We can add multiple format codes with a ; as delimeter  echo -e '\033[42;31mHello World' To remove all formatting, the format code is 0. echo -e '\033[31mHello \033[0mWorld' It is better to add \033[0m at the end of each colored text. To Bold the text, the format code is 1. echo -e '\033[1mHello World' You can find more format codes in the below link: https://misc.flogisoft.com/...

Create a new layer in Yocto - Manual/Script

Image
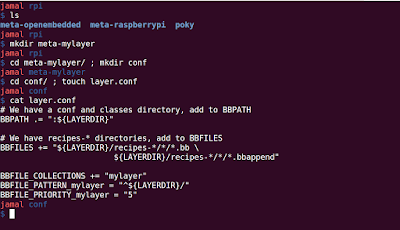
What is a layer in Yocto? A layer contains meta data. meta data means configuration files, classes and recipes. Layers allow you to isolate different type of customizations from each other. When you clone the poky source code. $ git clone -b thud git://git.yoctoproject.org/poky.git You already have the following layers: meta meta-skeleton meta-yocto-bsp meta-poky meta-selftest You may need to include additional layers as per your requirement for example, if you are building image for raspberry pi3 you need to add the layer: meta-raspberrypi Two ways to add an existing layer: 1. Manual: Add the existing layer path inside BBLAYERS variable in conf/bblayers.conf file 2. Using script: bitbake-layers add-layer <path to existing layer>. This will update bblayers.conf file. You can find existing layers on layers.openembedded.org . If you don't find a layer with the recipes you need, you can also create your own layer. There are two ways to create yo...

Setting Default permissions of files and directories in linux

Image
Each file on the system has a set of permissions that determine which users can access the files and what type of access they have. When you create a file/directory in Linux, it gets the default permissions set by the system administrator. For example, when I created a file in Linux, I got permissions: '0664' When creating a directory, the permissions in my system are: '0775' File creation mask determines default permissions. If no mask were used the permissions would be: 666 for files 777 for directories File creation mask is set by system administrators. To set this mask or know the current mask, 'umask' command is used. Running 'umask' without any arguments will show the current mask. To set filemask: 'umask <octal value of permissions> or 'umask -S <symbolic notation>' The permissions of file will be : Base Permission (0666) - umask value(0002) in my case = (0664) The permissions of directory ...

Difference between ./myscript.sh and source myscript.sh(. myscript.sh)

Image
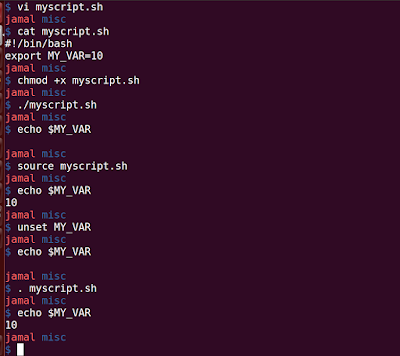
When you run ./myscript.sh, a new child process of shell is created and script is run there. So, if you export any variables in the script, after the script completes execution, they don't exist. Whereas when you run source myscript.sh or '. myscript.sh', it won't create a child process, instead it will run in the same environment, hence values of environmental variables persist. The below is the screenshot of a simple script which exported a variable and the result is different when you run ./myscript.sh or source myscript.sh Modified the script to print the PID and PPID of the script, with 'source myscript.sh', the PID of the shell script is the PID of the shell, whereas in './myscript.sh' it is different.

Debugging Linux Kernel using ftrace Part21 - kernel function profiling

Image
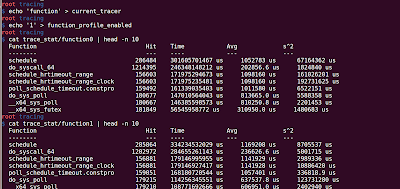
From Wikipedia, function profiling provides you the following : Space or Time Complexity of a Program Usage of Particular Instruction Frequency and duration of function calls ftrace can provide you the following function profiling information using 'function_profiling_enabled' file.  Frequency of function calls (When the tracer is 'function') Duration spent in each function calls (When the tracer is 'function_graph') Steps for Function profiling: 1. Enable the function tracer: 'function'/'function_graph' echo 'function' > current_tracer 2. Enable the function profiling: echo '1' > function_profiling_enabled To observe the results look into '/sys/kernel/tracing/trace_stat' folder. You will observe a lot of file with the following name: function<number> (e.g. function0, function1,...), where number represents the core on which the function is executing. So, if you have 4 Processors, funct...

Serial Port Programming Part11 - stty tutorial

Image
stty is used to display the current terminal settings Modify the terminal settings Display all settings: stty -a The above command displays settings of tty device attached to your shell If you want to find out the settings of another device file,  specify the device file name using '-F' option stty -F -a /dev/ttyUSB0 Set/Clear a particular setting: To clear a particular setting, add a '-' in front of the setting. For example, to disable hardware flow control, you need to run  stty -F /dev/ttyUSB0 -crtscts To enable the setting, dont add '-' in front of the setting stty  -F /dev/ttyUSB0 crtscts Changing the baud rate: stty -F /dev/ttyUSB0 <new baud rate> Store/Restore Settings: stty allows you to save settings for you to restore later. 'stty -g' command will display settings in a format which you can use pass later to stty

Debugging Linux Kernel using ftrace Part 20 - Write into trace file from user space

Image
Writing to 'trace_marker' file from userspace will write into the ftrace ring buffer. 'trace_marker' and 'tracing_on'  help us find out what is happening inside the kernel at a particular line of the user space application. User Code: Output: Observation: You can see in the code, I want to observe what internally 'sleep' command does. But not sure in the trace file output, where the kernel functions related to sleep starts and ends. Writing to trace using the 'trace_marker' helps us to coordinate between user code and kernel code.

Serial Port Programming Part 10 - Reading/Writing Status of Control Lines: DTR/RTS/CTS/DSR

Image
If the user is interested in finding out the status of Control Lines:DTR/DSR/RTS/CTS. He can use 'TIOCMGET' control code in the ioctl call. 'TIOCMSET' control code in  ioctl allows you to set/clear DTR and RTS lines as they are output. Example Code: Output:

Serial Port Programming Part 9 - Hardware Flow Control - RTS,CTS

Image
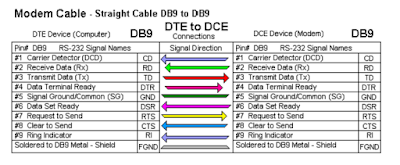
What is Flow Control? Technically, flow control is a mechanism in which receiver can control the transmission speed. This is done in case of superfast sender and slow receiver. If we don't have flow control, in this case, the receive buffer in the receiver will be overwritten with the new data. Hardware Flow Control in RS-232: RS-232 provides two control lines for hardware flow control: RTS (Request to Send) CTS (Clear to Send) RTS/CTS is handshaking method which uses one wire in each direction to allow each device to indicate to the other whether or not it is ready to receive data at a given moment of time. The RTS pin of one device will be connected to CTS pin of the other device. RTS pin is output and CTS pin is input. In case of connecting DTE to DTE(null modem cabling), we connect RTS of one device to CTS of other device. In case of connecting DTE to DCE (straight through cabling), we connect RTS to RTS and CTS to CTS. A device which...

Building Yocto Image for Raspberry Pi

Image
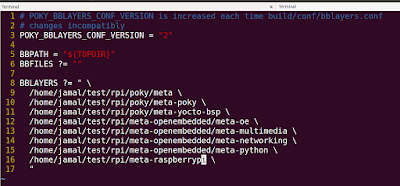
The current stable branch of Yocto is Thud. Following are the steps for generating image for Raspberry Pi3 for Thud Branch. Step1: Clone the Poky Layer (Thud branch) $ git clone -b thud git://git.yoctoproject.org/poky.git Step2: Clone the meta-openembedded Layer (Thud branch), as it is one of the dependencies mentioned in https://git.yoctoproject.org/cgit.cgi/meta-raspberrypi/about/ $ git clone -b thud git://git.openembedded.org/meta-openembedded Step3: Clone the Raspberry-Pi BSP Layer: meta-raspberrypi (Thud branch) $ git clone -b thud git://git.yoctoproject.org/meta-raspberrypi Step4: Once you complete cloning, there should be three folders: poky, meta-openembedded, meta-raspberrypi Step5: Run the environment script to setup the Yocto Environment and create build directory ("raspi-build") $ source poky/oe-init-build-env raspi-build Step6: Add meta-openembedded layers ( meta-oe, meta-multimedia, meta-networking, meta-python) and meta-raspbe...

My notes on Makefile

'make' utility is a powerful tool that allows you to manage compilation of multiple modules into an executable. A makefile contains a set of dependencies and rules.A dependency has a target (a file to be created) and set of source files upon which it is dependent.The rules defines how to create a target from the dependent files. It reads a specification file called : makefile or Makefile, that describes how the modules of a software system depend on each other. If you want to use a non standard name, you can pass '-f' option to specify that name. Make utility uses the time when various modules modified, to only recompile those modules. structure of Makefile: target: dependency1 dependency2 dependency3            command Target: Name of the executable to be build dependency1, dependency2, dependency3: Name of the files on which target depends (.c and .h files) command: shell command to create the target from dependencies Simple Makefil...

Yocto Recipe for automatically loading Out of Tree Linux Device Drivers on Start

Image
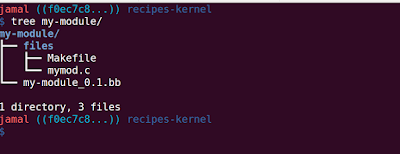
We can instruct Yocto to automatically start our own Linux Kernel Module on Start. Steps: 1. Create a folder 'recipes-kernel' in your own custom meta layer if it doesn't exist $ mkdir recipes-kernel 2. Inside 'recipes-kernel', create a folder 'my-module' for storing recipe and device driver files $ cd recipes-kernel; mkdir my-module 3. Inside 'my-module', create 'files' folder and copy your device driver files $ cd my-module; mkdir files 4. Copy this Makefile in the 'files' directory 5. Come back to the parent folder (i.e., my-module) and create a recipe for building the module $ cd .. ; touch my-module_0.1.bb You should have the following tree after this step. 6. Add this module into your configuration file (local.conf file or machine.conf) MACHINE_ESSENTIAL_EXTRA_RDEPENDS += "kernel-module-mymod" KERNEL_MODULE_AUTOLOAD += "mymod" MACHINE_ESSENTIAL_EXTRA_RDEPENDS tells yocto to build th...

stdout vs stderr

Image
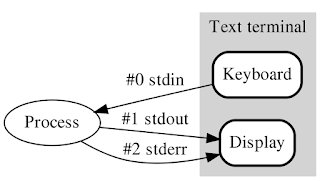
When a process is created in Linux, three file handles are already open for use: 1. stdin (Standard input) with file descriptor value '0' 2. stdout (Standard output) with file descriptor value '1' 3. stderr (Standard Error) with file descriptor value '2' read(0, buf, sizeof(buf)) will read from the standard input which is the keyboard and store it in 'buf'. Note: We need to null terminate the buffer manually. write(1, "hello", sizeof("hello")) will write to the standard output which is the console write(2, "hello", sizeof("hello")) will write to the standard error which is also console So, why we have two (stdout and stderr), as they are performing the same operation. No there are some differences: stdout vs stderr: stdout is fully buffered and stderr is not buffered . This means when we write to stdout, it goes to a buffer and when we command it to display on the console, it displays it. For e...

Debugging Linux Kernel using ftrace Part 19 - Finding Maximum Kernel Stack Size

Image
Kernel has a fixed stack size. The default stack size for process running in kernel is 8K. Call a function in recursion without any break, you will observe system will freeze within seconds. A kernel developer should be careful with what they are allocating on the stack. If he adds a lot to the kernel stack, stack overflow can happen and finally system panic. To enable the stack tracing functionality, echo 1 > /proc/sys/kernel/stack_tracer_enabled Wait for few minutes to get a better information. Files to look to get stack information: /sys/kernel/tracing/stack_max_size: Displays the maximum size it has encountered /sys/kernel/tracing/stack_trace: Displays the backtrace of the largest stack trace encountered after activating stack tracer /sys/kernel/tracing/stack_trace_filter: Limits what functions stack tracer will check, it is similar to "set_ftrace_filter"

Debugging Linux Kernel using ftrace Part 18 - Starting ftrace at boot

Image
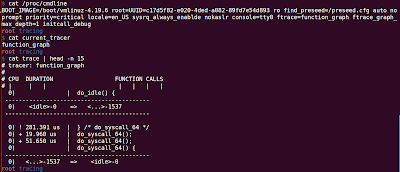
Kernel provides many command-line parameters for ftrace. 1. ftrace = [tracer] : This will set and start the tracer as early as possible in boot 2. ftrace_dump_on_oops : This will print oops message on kernel panic or on oops 3. ftrace_filter=[function_list]: Function-list is a comma-separated list of functions. Traces only the functions present in the filter at boot. 4. ftrace_graph_filter=[function_list]: Limits the top level callers functions traced by function graph tracer 5. ftrace_notrace, ftrace_graph_notrace=[function_list]: Opposite of ftrace_filter, and ftrace_graph_filter. Will not trace the functions listed in this parameter. 6.  ftrace_graph_max_depth=<uint>: Used along with function graph tracer. This is max depth it will trace into the function 7. tracing_thresh=<uint>: Will trace only the functions taking longer than passed values. Let's add the following command line parameters to kernel: ftrace=function_graph ftrace_graph_max_depth=1 ...

Difference between ?= and ??= in Yocto

Image
= operator assigns a value to the variable. Values must be surrounded by double quotes. E.g. FOO = "hello" The value of FOO variable is "hello" ?= operator allows you to have a default value for a variable. When the statement with ?= is parsed If the variable is undefined at the statement, the default value is assigned If the variable is assigned at this statement, then it will keep the original value and will not assign this value. When there are multiple ?= assignments to a single variable, first of these is used. To check the value of any environmental variable: "bitbake -e <image_name> | grep ^VAR_NAME=" E.g. bitbake -e core-image-sato | grep ^DISTRO= ??= operator allows you to achieve a "weaker" assignment for a variable. This assignment is similar to ?= except the value is assigned at the end of the parsing process. When multiple assignments are present, the value of the last assignment is tak...

Serial Port Programming Part 8 - DTR and DSR

Image
DTR and DSR are two control signals used by DTE(PC) and DCE(modem) to indicate they are alive. DTR (Data Terminal Ready): Connected from DTE to DCE. This pin is output on DTE and input on DCE. High on this pin indicates that the DTE is alive and Low on this pin indicates that there is some problem with the DTE. When the terminal (PC) is turned ON, after going through self-test, it asserts the DTR signal. DTR is present on pin20 of DB25 Connector and Pin4 of DE9 Connector. DSR(Data Set Ready): Connected from DCE to DTE. This pin is output on DCE and input on DTE. High on this pin indicates that the DCE is alive and working and low on this pin indicates the problem with DCE. When the DCE(Modem) is turned ON, after going through self-test, it asserts DSR to indicate that it is ready to communicate. DSR is present on pin6 of DB25 Connector and Pin6 of DE9 Connector.

Yocto Recipe for a GTK Application

Image
Say, you have a GTK Application and you want this application to be compiled and installed on the target machine. hello_gtk.c To compile on your own machine you run the following command. $ gcc files/hello_gtk.c -o hello_gtk `pkg-config --cflags --libs gtk+-3.0` Steps to achieve the same on your Yocto Image: 1. Create a folder named 'gtk-hello' in your own layer : mkdir gtk-hello 2.  Create a recipe named 'gtk-hello_1.0.bb' in the newly created folder with the following contents: 3. Create a folder inside 'gtk-hello'  named files and copy the 'hello_gtk.c' file into it 4. To include this add IMAGE_INSTALL += "gtk-hello" into local.conf or your machine configuration

My notes on FILES in C

Reading File Line by line: FILE *fp  = fopen("filename", "r"); char buf[512]; while(fgets(buf, 512, fp)!=NULL) {     puts(buf); } fclose(fp); Reading File Character by Character: FILE *fp  = fopen("filename", "r"); int ch; while((ch = fgetc(fp))!=EOF) {     putchar(ch); } fclose(fp); Random Access : ftell(fp) returns the offset of the File The  rewind() function sets the file position indicator for the stream pointed to by stream to the beginning of the file.               (void) fseek(stream, 0L, SEEK_SET)

Serial Port Programming Part 7 - Should we connect TX-TX or TX-RX

Image
RS232 is an serial communication standard developed by Electronics Industries Association (EIA) in 1960. It has several revisions through the years with an alphabet at the end to denote the revision number such as RS232C. RS in RS232 stands for Recommended Standard. Standard defines the maximum length of the cable as 15 meters. But the revised standards specify the maximum length in terms of capacitance per unit length. RS232 standard defines two types of devices: 1. DTE (Data Terminal Equipment) : Refers to terminals and computers that send and receive data E.g. Serial Port on PC 2. DCE (Data Communication Equipment): Refers to communication equipment, such as modems that is responsible for transferring the data. E.g. Modem For short distance communication, digital signal can be transferred on a simple wire. During long-distance communication we need modem. Modem will convert 0s and 1s to audio tones (modulate) before sendi...

Runtime loading of dynamic libraries in Linux

Image
In Linux, libraries which are linked during linking stage of the program, gets loaded during the startup of the program, unless a copy is already present in memory. Another approach provided by Linux operating system is to load/unload the libraries at run time whenever it is needed. API's are provided by Linux for Loading the Library -- dlopen() Looking up for symbols -- dlsym() Handling Errors -- dlerror() Unloading the Library -- dlclose() Header File : #include <dlfcn.h> Note: While building the program, you need to link 'ldl' library: -ldl Flow: 1. Process begins with a call to dlopen API, providing the path of the shared library and the mode. Main two values for this mode are RTLD_NOW, RTLD_LAZY. This informs the dynamic linker when to perform relocations. RTLD_NOW will make all the necessary relocations at the dlopen call time, whereas RTLD_LAZY will perform relocations only when they're needed. dlopen function returns a handle which is...

Avoid gcc deleting intermediate files while compiling C Code

Image
We know our C Code goes through four stages: Preprocessing, compiling, assembling and linking gcc creates many intermediate files for each stage. By default gcc deletes these intermediate files. You can instruct gcc to avoid deleting intermediate files passing '--save-temps' option to it. Observe from the above screenshot, the intermediate files after Preprocessing (*.i) Compiling (*.s) assembling (*.o) Are placed in the same directory

TIVA Launchpad TM4C123 Part 2 - Push Button

SW1 Push button is connected to PF0 Pin, SW2 Push button is connected to PF4 Pin. Notice that there is no pull up resistor connected to SW1 or SW2. To use SW1 and SW2 we need to enable the internal pull-up resistor for PF0 and PF4 pins. Steps for Switching Green LED on SW1 push and RED Led on SW2 Push 1. Enable the clock to PORTF 2. Set the Direction Register PF4, PF0 as input and PF1, PF3 as output 3. Select the Digital I/O feature of PORTF 4. Enable the pull-up resistor option in PUR register for PF0 and PF4 pins 5. Read GPIODATA value and set the LED depending on which button is pressed 6. Repeat Step 5 For SW2, extra steps need to be taken as PF0 pin to which SW2 is shared with NMI. To prevental accidental write to configuration registers and thus NMI, the configuration register bits for PF0 are normally locked. It may be unlocked by writing a passcode value of 0x4C4F434B to the LOCK register followed by setting bit 0 of the commit register. main.c Now press SW1 ...

TIVA Launchpad TM4C123 Part 1 - Blinking RGB LED

Image
Before we start writing programs, we need to install the following softwares. 1. Download and install the latest version of Code Composer Studio (CCS): http://processors.wiki.ti.com/index.php/Download_CCS 2. Download and install the full version of TivaWare from below link. The file name to download is SW-TM4C-x.x.exe http://www.ti.com/tool/sw-tm4c 3. Download and install the latest LM Flash Programmer http://www.ti.com/tool/lmflashprogrammer 4. Download the TM4C123GHGPM Microcontroller datasheet and User Guide http://www.ti.com/lit/ds/symlink/tm4c123gh6pm.pdf http://www.ti.com/lit/ug/spmu296/spmu296.pdf 5. Run the Code Composer Studio 6. File -> New -> CCS Project 7. Select 'TIVA TM4C123GH6PM' from the drop down list, enter the Project Name: 'LED_BLINK' and click on 'Finish' 8. On the board, PF1 is connected to RED LED, PF2 is connected to BLUE LED and PF3 is connected to GREEN LED. GPIO Registers in TM4C123: Dat...

Debugging Linux kernel using ftrace Part18 - set_ftrace_filter

Image
ftrace by default will trace all the kernel functions. The information generated is huge and very difficult to get hold by any human. ftrace provides a way to limit the amount of information generated using set_ftrace_filter. If we add any functions in the set_ftrace_filter, ftrace will skip tracing all the other functions and only will trace the functions listed in the set_ftrace_filter file. In the above screenshot, you can see 1. First we set the current tracer to "nop" 2. We cleared the trace ring buffer 3. Then we told the ftrace to only trace "i8042_interrupt" which is keyboard/mouse interrupt handler by echoing on set_ftrace_filter 4. Then we enable "function_graph" tracer 5. Now reading the "trace" file, you will observe only i8042_interrupt function is displayed. You can see it takes on average of 100 us for each key press by i8042 interrupt handler. If you want to trace multiple functions, you can use the append operat...

Yocto recipe to copy a single file on the root file system

Image
If you have a single file for example a video file or a script file and you want this file to be present on the root file system. There are two steps for this: 1. Create a recipe 2. Add this recipe into your local.conf file For this post, let's consider I want to copy a script file to bin folder of root file system. 1. Create 'recipes-support' folder in your own 'meta' layer 2. In 'recipes-support' folder create a new folder named  as per your requirement, for example 'emc-test' 3. cd into the folder and then create a folder named 'files' into that 4. Copy your script into the files folder. 5. cd back to the emc-test folder and create a file named 'emc-test_0.1.bb' 6. Copy the below recipe and paste into it and make modifications as per your files 7. Add the following line into local.conf : IMAGE_INSTALL += "emc-test"

My notes on Sorting in C

Bubble Sort: Simplest sorting algorithm Repeatedly comparing pair of  adjacent element and swapping if they are not in order Not suited for large datasets, as its worst-case complexity is O(n2) where n is the number of elements because the entire array needs to be iterated for every element. E.g. 15, 32, 26, 34, 11 First Pass: ( 15 , 32 , 26, 34, 11) -> ( 15 ,  32 , 26, 34, 11)  No swapping as the elements are in order (15,  32 , 26 , 34, 11) -> (15,  26 , 32 , 34, 11) Swapped as 32 > 26 (15, 26,  32 , 34 , 11)  -> (15, 26,  32 , 34 , 11) No Swapping as the elements are in order (15, 26, 32,  34 , 11 ) -> (15, 26, 32,  11 , 34 ) Swapped as 34 > 11 Second Pass: ( 15 ,  26 , 32, 11, 34) -> ( 15 ,  26 , 32, 11, 34) No swapping as the elements are in order (15,  26 ,  32 , 11, 34) -> (15,  26 ...

Using devtool in Yocto to patch/customize recipe/package sources

Image
When you build a particular recipe by running the command "bitbake <recipe_name>", yocto framework creates a tmp/work/<architecture>/<recipe>/<version> directory. Also known as "work" directory. This is the directory where Yocto performs all the tasks such as fetching the source, configuring, building and packaging etc. Sometimes, you need to add customizations on top of downloaded recipe source code. For example you have 'matchbox-terminal' recipe and you have a customization to hide the title bar. You will find the work directory in 'build/tmp/work/corei7-64-poky-linux/matchbox-terminal/0.1-r0/' and source code in 'build/tmp/work/corei7-64-poky-linux/matchbox-terminal/0.1-r0/git/' To add our customizations, we basically open main.c and add our customizations and then recompile it using bitbake command, and this is not the best approach in Yocto for making customizations, as  you can easily lose ...