Posts

Showing posts from March, 2019

Embedded Scripting in RN4871 - Turn Led on Connect and off Disconnect

Image
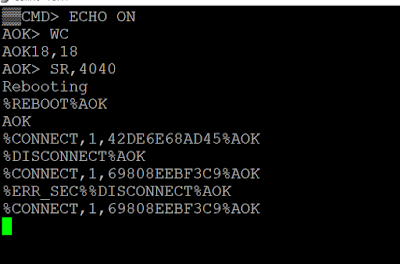
RN4871 supports embedded scripting: Steps to turn LED On during connection and Off during disconnection: 1. Type '$$$' to enter command mode 2. Type '+' for ECHO back the commands we typed 3. Type 'WC' to clear the script 4. Type 'WW' to add a new script. Type the below following: @PW_ON SW, 0A, 00 #Remove special functionality on Pin 12 SW, 0B, 00 # Remove special functionality on Pin 13 |O,18,00  #TURN LED ON |O,18,18 #TURN LED OFF @CONN |O,18,00 #TURN LED ON @DISCON |O,18,18 #TURN LED OFF 5. Type ESC to come out of script to command mode 6. Type 'SR,4040' to start the script to run after power on and with no prompt 7. Type 'R,1' to reboot the module 8.  Connect Male to Female Cable from P12 (J11) to any pin on JP5 When you connect from Phone, the LED will be ON and when you disconnect it will be OFF

Emulating Microchip RN4871 as HID Keyboard

Image
Steps to emulate RN4871 as a keyboard (HOGP - HID Over GATT Profile) Step 1: Open the COM port of the RN4871 on any serial terminal (putty). Baud rate:115200 Step 2: Type '$$$' to enter into Command Mode Step 3: Type '+' for echo back the command we typed Step 4: Type 'SF,2' to perform Factory reset Step 5: Type '$$$' to enter back into Command Mode Step 6: Type '+' for echoing back the commands we typed Step 7: Type 'SN,KEYBOARD' to give the BLE device name: KEYBOARD Step 8: Type 'SDA, 03C1' to set Appearance in GAP Service as Keyboard Step 9: Type 'PS,180F' . 180F is the Battery Service UUID Step 10: Type 'PC,2A19,02,01 ' . we defined battery characteristic of Read property with 1 byte value Step 11: Type 'PS,180A'. 180A is the UUID of Device Information Step 12: Type 'PC,2A50,02,07'   . 2A50 is the UUID of PnPID Step 13: Type 'PS,1812'.   1812 is the UUID of HID Inform

How to take screenshot of a particular portion of screen in Ubuntu

Image
When you press PrtScr, it will take the screenshot of whole screen on the Desktop. What if I want to use the functionality which the Snipping Tool of Windows Provide? Shift + PrtScr will get you the same functionality in Ubuntu Press Shift + PrtScr and then select the portion of the screen you want to take screenshot and save the file.

Atmel SAMB11 Xplained Pro Part 1 - Getting Started

Image
SAMB11 Xplained Pro evaluation kit is a hardware platform to evaluate the Atmel ATSAMB11G18A. Features: ATSAMB11G18A microcontroller - Bluetooth Low Energy 4.1 compliant SoC Reset button User button Yellow User LED 32.768kHz crystal USB Powered Integrated Flash: 256KB On-Board Embedded Debugger On-Board temperature sensor Getting Started: 1. Download Atmel Studio from the below link: http://www.atmel.com/tools/atmelstudio.aspx 2. Launch Atmel Studio 3. Connect USB Cable between the PC and the DEBUG USB Port on the Kit. After a successful connection, the Atmel Studio will show the Start Page like below. 4. Click on New ASF Example Project 5. Select the one highlighted in the screenshot and click OK 6. Build the Project. 7. To flash on the board: Click on Tools -> Device Programming 8. Click on Memories and Program 9. Open Putty with COM Port of EDBG and baud rate of 115200. Pressing user button, serial message will

Steps to download and build Yocto Image for Digikey ConnectCore 6UL SBC Express

1. Install the repo tool. sudo curl -o /usr/local/bin/repo http://commondatastorage.googleapis.com/git-repo-downloads/repo sudo chmod a+x /usr/local/bin/repo 2. Create an folder to download and build mkdir -p ~/digikey cd ~/digikey 3. Run the below command to download the sources repo init -u https://github.com/digi-embedded/dey-manifest.git -b rocko repo sync -j8 --no-repo-verify 4. Initialize the environment by running the following command: source ~/digikey/mkproject.sh -p ccimx6ulstarter Accept the EULA 5. Build Image bitbake core-image-base

Adding build information in target Yocto

Image
"image-buildinfo" is a feature provided by Yocto. When you include this in the image, a new file '/etc/build' will be created. This file contains the following information: git commit ids of all the meta-xxx layers used in the image creation Distro Name and version

Modifying device tree in Yocto using recipetool

Image
Steps to modify device tree using recipetool: 1. Setup the environment by running oe-init-buildenv script 2. Run the following command to generate a recipe for devicetree using recipetool recipetool appendsrcfile -wm your-machine-name path/to/meta-mylayer virtual/kernel /path/to/your.dts 'arch/${ARCH}/boot/dts/your.dts' The above command will create a bbappend file with all the necessary information 3. If you are using a different name for device tree, then update the linux bbappend file with the new name KERNEL_DEVICETREE += "new_name.dtb"

POSIX Capabilities Part 3 - CAP_SYS_BOOT - Allow Non-root user to reboot

Image
Linux provide 'reboot' api to allow user to perform a reboot from Linux Code. #include <unistd.h> #include <sys/reboot.h> int reboot(int cmd); reboot(RB_AUTOBOOT); will print the message "Restarting system." and reboot will be performed. If a non-root user tries to perform this, it will fail with permission denied error. Now, if we run cap_sys_boot_test, the system will reboot when run with non-root user.

POSIX Capabilities Part2 - CAP_DAC_OVERRIDE - Bypass permission check

Image
CAP_DAC_OVERRIDE: Allows a non-root user full file system access. Bypasses file read, write and execute permission check. DAC stands for "discretionary access control" Let's see an example using this capability. You can see from the above screenshot, after giving 'CAP_DAC_OVERRIDE' capability, i am able to open '/etc/shadow' which only root user can access.

POSIX Capabilities Part 1 - Introduction

Image
What is POSIX Capabilities? Traditionally Linux/Unix only had two level of privileges: 1. Root 2. Non-Root No security checks where performed for processes running in root user, whereas processes running in non-root user were subjected to security checks. No intermediate solution was existing at that time. setuid was only the option for the non-root processes to get privileges. Giving all privileges when only few were required was not a good solution and is a target for attack. POSIX Capabilities is a concept which divides root privileges into a set of privileges. These privileges/values then can be independently assigned to the processes, by this way the process will only contain the require privileges and some level of security is achieved. What all Capabilities exist? File '/usr/include/linux/capability.h' contains list of capabilities available in Linux or man  capabilities Command to find which capabilities are set for a particular file? getcap &

bb.utils.contains yocto

Image
bb.utils.contains  is most commonly used function in Yocto. grep in poky directory returned with 696 count. $ grep -nr 'bb.utils.contains' poky/ | wc -l 696 It's definition is present in 'poky/bitbake/lib/bb/utils.py' file This function returns third argument if the second argument is subset of the first argument else returns fourth argument Let's take an example to understand this. You can see from the above screenshot, when the second argument is a subset of first argument, "present" was returned, else "notpresent" was returned We can also use bb.utils.contains inside if loop. This we can use inside a recipe. if ${@bb.utils.contains('SOMEFLAG','NEWVALUE3','true','false',d)}; then     FOO = 'HELLO' fi

Run Commands only on first boot in Yocto

If you have a requirement of executing a particular command only when the system is booting first time, you can use 'pkg_postinst_ontarget_${PN} ()' function and add your commands in this. This will create a script file with the commands you given in the above function and that script will be executed by init subsystem and after execution, script will be deleted. I have used this to provide POSIX capabilities to my particular binary. To add POSIX Capabilities, I added the following in my recipe: RDEPENDS_${PN} = "libcap libcap-bin" pkg_postinst_ontarget_${PN}() { setcap cap_dac_override,cap_sys_admin,cap_sys_boot,cap_fowner+ep $D/${bindir}/<mybinary> } The above changes will make the init system to execute the setcap command only once.

Implement Copy, move and delete a file in Linux- rename, unlink

Image
Hi Guys, In this post, we will see how to use Linux API's to perform copy, move and delete file operations There is no direct Linux System Call for copy operation, we need to manually open one file in read mode, and other in create mode, and then start writing one by one For move operation, the Linux System call is rename  #include <stdio.h>  int rename(const char *oldpath, const char *newpath); For delete operation, the Linux System call is unlink #include <unistd.h> int unlink(const char *pathname); Sample Code to use all the API's Output:

Run commands after rootfs creation in Yocto

Image
With ROOTFS_POSTPROCESS_COMMAND, you can run post processing commands, after the build system has created the root file system. Say for example, I need to create a new directory in the root file system home folder. Steps: 1. Create a .bbappend file of your image which you are generated E.g. if you are generating core-image-base.bb, create core-image-base.bbappend file 2. Add a function similar to the below screenshot IMAGE_ROOTFS : Variable containing the path of the root file system while it is in construction. 3. Now build the image, using bitbake bitbake core-image-base

Create a bbappend file using recipetool in Yocto

Image
In our previous post, we have seen how to create a base recipe using recipetool . recipetool also allows us to create/update a bbappend file to add or replace a source file. Now in our previous post related to dropbear, we wanted to add arguments to the init script to avoid root login over SSH, we did the following steps manually create a 'recipes-core/dropbear' folder in your layer Copied the original init file and modified it according to our requirement and copied it in 'files' folder Create a .bbappend file to use the new 'init' With recipetool you can avoid this manual process. You can see in the below screenshot, how easy it is to create a bbappend file using 'recipetool appendsrcfile' command

Yocto recipetool tutorial

Image
There are two ways of writing a recipe: 1. Writing from scratch 2.  Using recipetool to create a recipe for us We will see in this post on how to create a base recipe using recipetool Syntax for recipetool for local source: recipetool create source Let's try to pass a simple hello.c file to recipetool and observe the output. Note: Yocto environment script should be run, for us to use recipetool The recipetool command created 'hello.bb' with the following information added in the recipe: LICENSE = "CLOSED" SRC_URI Empty configure(), compile(), install() tasks. We can pass 'o' option to change the name of generated recipe $ recipetool create -o test_recipe.bb hello.c When given a tar file, it added CHKSUM as well as any inherits. It added a 'DEPENDS' variable, when passed dropbear tarball

setuid permissions in Linux

Image
setuid stands for Set User  ID on Execution. What is User ID(UID)? UID is a number used to uniquely identify the user on the system, and to determine which system resources the user can access. When you create a file, the ownership of the file will be based on the user id and group id of the user created the file. When you run a process, the process will be running with the user id and group id of the user starting the process . It means, if user1 created an executable file, the owner and group of file will be the user1, but when we run the executable with other user, the uid of the process will be the other user not the user created the executable. getuid()  returns the User Id of the calling process. In the above screenshot, I created hello.c with the user 'jamal', so the owner and group is 'jamal'. But when running the generated executable/process we get the uid of the user who started the executable/process. If you set the setuid bit on the executa

sticky bit in Linux

Image
In addition to read, write and executable (rwx), there are three special permissions for files and directories: Sticky bit SUID Permission SGID Permission The use of sticky bit is to have a folder shared between all the users. For example, if you have a folder with 777 permissions, this means user for example user1 can delete the files can read, write and delete the files created by user2. With sticky bit enabled on the directory, user1 can only read/write the file but cannot rename or delete the file. /tmp is a folder in Linux with sticky bit enabled How to set sticky bit? chmod +t mydir How to unset sticky bit? chmod -t mydir How to find out all directories with sticky bit enabled? find / -perm +1000 chmod 1777 mydir will create the directory with sticky bit enabled

Steps to build out of tree kernel modules using Yocto SDK

Image
One of the good feature of Yocto is SDK, it provides application team/developers to concentrate on their application and platform team to concentrate on image customizations. To provide SDK with the kernel source, you need to add the following in your local.conf/machine.conf file TOOLCHAIN_TARGET_TASK_append = " kernel-devsrc" This will include the Kernel Source code in the SDK. Generate SDK after adding the above configuration using the following command. bitbake -c populate_sdk core-image-sato SDK will be present in 'build/tmp/deploy/sdk' folder. Install this SDK on the machine where you want to build kernel modules. Steps to use this SDK to build out of tree kernel modules: 1. Source the environment file for your SDK 2. cd to <SDKInstallPath>/sysroots/<mach>/usr/src/kernel and run 'make modules_prepare' 3. Now to compile the hello world or any other module. KERNEL_SRC=<SDKInstallPath>/sysroots/<mach>/usr/src/kernel