Posts

Showing posts from 2019

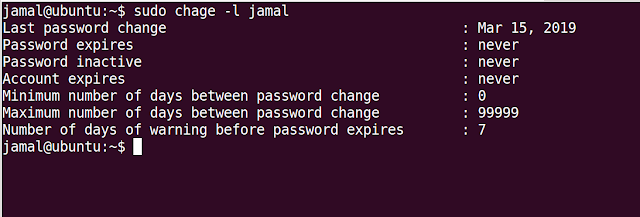
Linux driver example for Per CPU Variable

Image
Per CPU Variables is an interesting feature available from Linux Kernel Version 2.6 When you define a Per CPU Variable, each processor in the system will have its own copy of the variable, hence no locking is required and better performance is achieved. Header File: <linux/percpu.h> To create a Per CPU Variable at compile time, use the macro: DEFINE_PER_CPU(type, name); E.g. DEFINE_PER_CPU(int, counter); As linux kernel is preemptible, you must use get_cpu_var macro to access the current processor's copy of a given variable And finally call put_cpu_var macro after you have completed using it. You can access another processor's copy of the variable with: per_cpu(variable, int cpu_id); Example: Output:

Installing Raspbian Lite on Raspberry pi3

Image
Raspbian Lite is the operating system you want to choose, when you want to use sensors or web based applications on RaspberryPi. Raspbian vs Raspbian Lite: Raspbian lite is a minimal version of Raspbian. Following software/packages are removed from raspbian lite: Wolfram Libre Office Xserver It’s ideal if you intend to run the Raspberry Pi as a headless server without a GUI. Download Raspbian Lite from the Raspberry Website: http://downloads.raspberrypi.org/raspbian_lite/images/ To install, you can use various softwares. I am using etcher. Connect the SD Card, and flash the image  After flashing on the SD Card, connect it to the Raspberry Pi 3, connect Display over HDMI and power the device. You will get a login screen. Login Details: User name: pi, Password: raspberrypi Complete Initial Setup without connecting monitor and keyboard 1. Mount the SD Card and change directory to 'boot' volume. 2. Create wpa-supplicant.conf file wit

Linux driver example to print the current running CPU - smp_processor_id()

Image
When you have multiple processors present in the system, and want to find out on which the processor your driver code is running, use smp_processor_id(). Header file: #include <linux/smp.h> Example: Output: You can see from the above screenshot, the init function of the driver was running on Processor 1 and Kernel thread was running on Processor 4

Single Linux Device Driver code for multiple Linux versions using LINUX_VERSION

Image
The arguments of the kernel functions changes with new releases. For example, Kernel versions > 3.10 use the below function to create a proc entry proc_file_entry = proc_create("proc_file_name", 0, NULL, &proc_file_fops); For kernel versions < 3.10, this API was proc_file_entry = create_proc_entry("proc_file_name", 0, NULL); If you want to have a Linux Device Driver which supports multiple Linux Versions, use the macro LINUX_VERSION_CODE This macro expands to the binary representation of the kernel version For example for Linux version 2.6.10, the value is 132618(0x02060a) There is another macro KERNEL_VERSION(major, minor, release). This builds up the version number from the individual numbers. For example KERNEL_VERSION(2,6,10) will return 132618 Sample Code: Output:

Linux module to convert virtual to physical and vice versa

Image
virt_to_phys: Function converts kernel virtual address to physical address. phys_to_virt: Function converts physical address to kernel virtual address. Code: Output:

Linux Device Driver code to load another module

Image
Linux Kernel code can load module whenever needed. int request_module(const char *module_name); Header File: <linux/kmod.h> Source Code: kernel/kmod.c request_module is synchronous, it will sleep until the attemp to load the module has been completed. When the kernel code calls request_mode(), a new kernel thread is created, which runs modprobe program in the user context. Code: Output:

Linux Module to print number of CPU's

Image
We can look at /proc/cpuinfo to find out the number of processors present in Linux from user space. What if we want to find out the number of cpus in kernel module. num_online_cpus() function can give the number of CPU's which are online. Code: Output: References: https://stackoverflow.com/questions/43171805/find-number-of-cpus-in-linux-kernel

Linux Device Driver example for dump_stack() to print the stack trace of module loading

Image
One of the useful options in debugging is to print the call trace/stack trace. Linux kernel provides a function to print the stack trace: dump_stack(). Calling dump_stack() function will print the stack trace at that point. Code: Output:

Enable/Disable pr_debug in Linux Device Driver

Image
By default, the pr_debug messages are disabled. Consider the below sample code: Output: You can see, pr_debug log was not displayed on the dmesg output. To enable debugging output, build the  appropriate file with -DDEBUG by adding CFLAGS_[filename].o := -DDEBUG to the Makefile

vermagic in Linux Device Driver

Image
Vermagic is a magic string present in the Linux Kernel and added into the .modinfo section of the Linux Kernel Modules. This is used to verify whether the kernel module was compiled for the particular kernel version or not. ‘VERMAGIC_STRING’ is generated by the kernel configuration. #define VERMAGIC_STRING                         \     UTS_RELEASE " "                         \     MODULE_VERMAGIC_SMP MODULE_VERMAGIC_PREEMPT             \     MODULE_VERMAGIC_MODULE_UNLOAD MODULE_VERMAGIC_MODVERSIONS   \     MODULE_ARCH_VERMAGIC                        \     MODULE_RANDSTRUCT_PLUGIN Code: Output: If we change the value of 'vermagic' string using 'MODULE_INFO', we will get the error while loading the module.

MODULE_INFO in Linux Device Driver

Image
'modinfo' section in the .ko (ELF) file stores the Module information. MODULE_INFO is the macro which can be used in the source code to add information to this section #define MODULE_INFO(tag, info) __MODULE_INFO(tag, tag, info) #define __MODULE_INFO(tag, name, info)                    \ static const char __UNIQUE_ID(name)[]                     \   __used __attribute__((section(".modinfo"), unused, aligned(1)))     \   = __stringify(tag) "=" info MODULE_INFO is used in several places by other macros such as  license,  alias, author, vermagic. Some of the fields can be retrieved through the THIS_MODULE (struct module) Code: Output: modinfo utility lists each attribute of the module in form fieldname:value, for easy reading  from the Linux Kernel modules given on the command line In the above screenshot, we used readelf, to dump the contents of the modinfo section.

Linux Driver Code to print machine name, system name, release and Version

Image
init_uts_ns(init/version.c) variable in Linux Kernel contains the information about: Operating system name (e.g., "Linux") Operating system release (e.g., "2.6.28") Operating system version Hardware identifier When you run 'uname' command from user space, values from above structure are retrieved. Code Output:

Linux Device Driver Code to print all the loaded modules along with number of exported symbols

Image
Kernel module in Linux is represented by 'struct module' The module structure is defined in <linux/module.h> struct module {     enum module_state state;     /* Member of list of modules */     struct list_head list;     /* Unique handle for this module */     char name[MODULE_NAME_LEN];     .....     unsigned int num_syms;     .... }; The above structure has a linked list embedded in it, through which we can traverse to all the modules present in it Code: Output:

Print the module load time in Linux Device Driver while unloading

Image
In Linux Kernel, the number of timer interrupts per second is defined by 'HZ' variable. You can get the value of HZ Variable by running the following command. grep 'CONFIG_HZ=' /boot/config-$(uname -r) For example, if the value is 250, it means there will be 250 timer interrupts per second. Linux kernel maintains a global variable 'jiffies' which will be incremented for every timer interrupt. So, for every second, it will be incremented by HZ. Header File: #include <linux/jiffies.h> extern unsigned long volatile jiffies; HZ = (number of ticks)/sec jiffies = number of ticks To convert from seconds to unit jiffies: HZ * jiffies Convert from jiffies to seconds: jiffies/HZ Code to measure the Driver Load Time: Output:

KBUILD_EXTRA_SYMBOLS - Using Symbols exported from external module

Image
Consider a scenario where you have a symbol (variable/function) present in one external module and you want to use it in your another external module and the source code of these modules is not built by single Makefile, then even you export the symbol from first module, when you are building the second module, it will throw Warning saying that the exported symbol is not found. The above screenshot shows the module1 code which is exporting a variable 'my_class' kbuild needs  to have full knowledge of all symbols to avoid spitting out warnings about undefined symbols. When an external module is built, a Module.symvers file is generated containing all exported symbols which are not defined in the kernel. Use KBUILD_EXTRA_SYMBOLS and provide it the path of the Module.symvers file if it is present in some other directory other than the module directory. To resolve this, use KBUILD_EXTRA_SYMBOLS in the Makefile, add the following:  KBUILD_EXTRA_SYMBOLS := /home/

Change the name of module without changing the name of source file

Image
Suppose, you have a simple module file with name 'hello.c', you will write a Makefile without the following: obj-m := hello.o And it will create a hello.ko for you on running "make" command. What if you want the name as 'linux.ko' and don't want to rename the 'hello.c' to 'linux.c'. You need to update the Makefile using 'filename'-objs, for example to get 'linux.ko' from 'hello.c' file, the Makefile should be : Output:

Get name of kernel module in Driver Code - KBUILD_MODNAME

Image
Kernel build system defines KBUILD_MODNAME automatically from each Makefile. Following is the sample code which prints the name of module when loaded and unloaded. Ouptut:

THIS_MODULE in Linux Device Drivers

Image
What is THIS_MODULE? Whenever you create a kernel module, the kernel's build machinery generates a struct module object for you, and makes THIS_MODULE point to it. This struct contains many fields, some of which can be set with module macros such as MODULE_VERSION. You can see from the definition of THIS_MODULE macro that it is referring to '__this_module'. This is defined when we build the module file by running 'make' Let's write a sample module which prints the module name and version using THIS_MODULE. Output: You can see from the above screenshot, after running "make", it generated temporary files as well as the module(.ko). The *.mod.c file has struct module __this_module defined.

include vs require in yocto

Image
Bitbake allows sharing metadata using include files (.inc) and class files(.bbclass) The include files contains: 1. Definition of Paths 2. Custom tasks used by multiple recipes Whenever bitbake parses the 'include' directive, it will include the file you specified in that location. It is similar to #include of C. When the path you specified is relative, then Bitbake loads the first file it finds in the BBPATH 'require' is another directive which is similar to 'include', but the major difference is that 'require' will throw an error when it doesn't find that file. You can see in the above screenshot: 1. I created a simple C Code 2. Used recipetool to create a base recipe for that code 3. Copied that recipe in the meta folder 4. Added 'include test.inc' in the test recipe and bitbake test did not gave any error 5. When adding 'require test.inc' in the test recipe, bitbake fails with error.

MACHINE_FEATURES vs DISTRO_FEATURES in Yocto

MACHINE_FEATURES: Specifies a list of hardware features the MACHINE is capable of supporting. Yocto ships with a list of machine features: keyboard : Hardware has a keyboard screen : Hardware has a screen serial : Hardware has serial support (usually RS232) touchscreen : Hardware has a touchscreen bluetooth : Hardware has integrated BT wifi : Hardware has integrated WiFi For all the features supported by Yocto, you can visit:  https://www.yoctoproject.org/docs/current/mega-manual/mega-manual.html#ref-features-machine So, if your machine has no wifi chip, you can remove 'wifi' from MACHINE_FEATURES MACHINE_FEATURES_remove = "wifi" DISTRO_FEATURES: Specifies the software support you want in your distribution for various features. DISTRO_FEATURES may influence how the recipes are configured and the packages are installed in images. List of Distro Features:  https://www.yoctoproject.org/docs/current/mega-manual/mega-manual.html#ref-features-distro For

Linux chage command - Change Age

Image
chage stands for 'change age'. This command is used to change user password expiry information. Syntax: chage [options] LOGIN Examples: 1. List the password aging information of a particular user: $chage -l <username> From the above output, you can observe that the password expiration is disabled for this user. 2.  Change password expiry date: Use -M option to change the password expiry date, it accepts the number of days after which password will expire. You can use -m option which is the minimum number of days between password change. A value of zero means the user can change the password at any date. 3. Change last password change date: Use the -d option to change the last password change date. You can pass a number to this option or complete date 4. Disable Password aging for a particular user: chage -I -1 -m 0 -M 99999 -E -1 <username> -I --> Inactive -m --> Minimum number of days -M -->

Generate Build Statistics in Yocto

Image
Yocto build system allows you to collect build information per task and image. The data generated can be used to Identify areas of build times optimization, when new recipes are added to the system. To enable collection of build statistics, you need to inherit buildstats class by adding it to USER_CLASSES in your conf/local.conf or machine.conf By default the local.conf file generated by the oe-initbuild-env script will have the buildstats  in USER_CLASSES USER_CLASSES ?= "buildstats image-mklibs image-prelink" By default, the location of statistics is stored in build/tmp/buildstatistics  folder. You can change the location with BUILDSTATS_BASE variable. For each and every build, a new folder with the timestamp will be created in build/tmp/buildstatistics  Each folder contains: build_stats file:  host system information,  root filesystem location,  root filesystem size,  build time Average CPU Usage

PREFERRED_PROVIDER and PREFERRED_VERSION in Yocto

Image
When we run "bitbake <target>", bitbake looks at the PROVIDES variable of each recipe to find out the recipe for the particular target. The Default value of PROVIDES is PN. PN --> Name of the Recipe PV --> Version of the Recipe PR --> Revision of the Recipe PREFERRED_PROVIDER: Sometimes a target can have multiple providers. PREFERRED_PROVIDER determines which recipe should be given preference when multiple recipes provide the same item. E.g. virtual/kernel, u-boot will be provided by multiple recipes PREFERRED_PROVIDER_virtual/kernel = "linux-imx" PREFERRED_PROVIDER_u-boot = "uboot-imx" This should be written in local.conf or machine.conf PREFERRED_VERSION: When multiple versions of  a recipe are available, this variable determines which recipe should be given preference. If we don't state the version, bitbake will pick up the highest version. E.g. PREFERRED_VERSION_linux-imx = "3.10.17-1.0.0" PREFERRED_VERSI

Tracking changes to image contents in Yocto - buildhistory

Image
Yocto provides "buildhistory" to keep track of changes to the image.  To enable "buildhistory", need to add the following lines in the local.conf file. INHERIT += "buildhistory" BUILDHISTORY_COMMIT = "1" INHERIT method includes the buildhistory class hooks in the building process. BUILDHISTORY_COMMIT enables bitbake to create a new GIT Commit in the buildhistory process. During the first build with the above changes, "buildhistory" directory is created, which has the git repository inside it. You can see I have added the above lines to the local.conf file and modified the core-image-minimal image to include 'usbutils' package. Now, to find out what all has changed, you can use the script provided by poky: 'buildhistory-diff' To use this script you need to have installed GitPython installed. If you get the following error: "Please install GitPython (python3-git) 0.3.4 or later in order to use this scr

Conditional Metadaa in Yocto - OVERRIDES

Image
Bitbake provides a very way to write conditional metadata. It uses OVERRIDES variable to control what variables will be overridden after Bitbake parses recipes and configuration files. With OVERRIDES you can conditionally select a particular version of a variable and to conditionally prepend and append the value of variable. OVERRIDES variable contains value separated by colon character (:), and each value is an item we want to satisfy conditions. So, if you have a variable that is conditional on "x86", and "x86" is in OVERRIDES then x86 version will be used. You can see from the above screenshot, 'beaglebone-yocto' was present in OVERRIDES , so the default value of FOO ("bar") was overriden with FOO_beaglebone-yocto("hello") Now, I will change the MACHINE value to "qemux86", so instead of 'beaglebone-yocto' you will have 'qemux86' in OVERRIDES , and the value of 'FOO_qemux86' will be assi

Appending and Prepending in Yocto - +=, =+ vs .=, =.

Image
Bitbake provides two sets of appending and prepending operators. 1. +=, =+ 2. .= , =. For example, A = "hello" A += "world" C = "good" C =+ "bye" The value of A will be "hello world" and C will be "bye good" So, += is appending and =+ is for prepending. Note, that these operators include an additional space between each call When we don't need to add space, we can use .=, =. operators. These are mainly used to concatenate strings. When we use append, prepend, there will be no additional space added, you need to manually provide space. You can also remove values from the variable using 'remove'.

Force user to change password change on first login

Image
We will use chage for this. chage utility allows us to change the password expiry date. To run 'chage -d0 root' after rootfs is created we will use 'ROOTFS_POSTPROCESS_COMMAND'. Modified core-image-minimal.bb  by adding a 'ROOTFS_POSTPROCESS_COMMAND' Flash the image on the Beaglebone black. On first boot, it will ask you for changing the password.

Steps to build and flash Yocto Image on Beaglebone black

Image
Step1: Create a folder for Yocto source code: $ mkdir beagblebone_yocto && cd beagblebone_yocto Step2: Clone the poky source code: $ git clone -b thud git://git.yoctoproject.org/poky.git Step3: Run the environment script to setup the Yocto Environment and create build directory $ source poky/oe-init-build-env build Step4: Set the MACHINE variable to 'beaglebone-yocto' $ echo 'MACHINE = "beaglebone-yocto"' > conf/local.conf Step5: Build the core-image-minimal image $ bitbake core-image-minimal After a few hours, you will find the images will be present in beaglebone_yocto/build/tmp/deploy/images/beaglebone-yocto folder Step6: Take memory card and make two partitions using gparted: Partition1 : Size 100 MB, fat16 (boot flag) Partition2: Size > 2GB , ext4 Step7: Copy the files in the required partition. $ cd beaglebone_yocto/build/tmp/deploy/images/beaglebone-yocto  $ cp MLO-beaglebone-yocto /media/jamal/boot