Posts

Showing posts with the label yocto

include vs require in yocto

Image
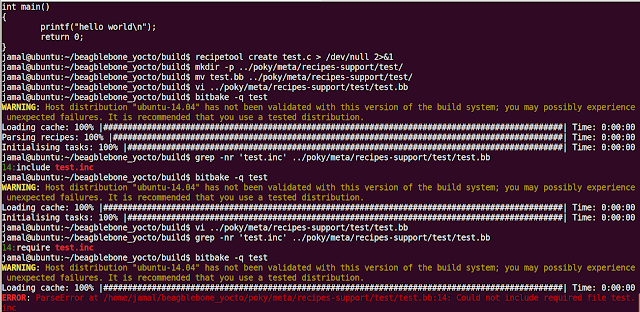
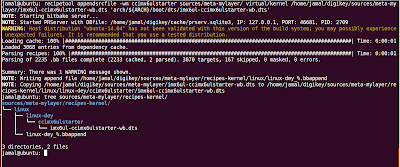
Bitbake allows sharing metadata using include files (.inc) and class files(.bbclass) The include files contains: 1. Definition of Paths 2. Custom tasks used by multiple recipes Whenever bitbake parses the 'include' directive, it will include the file you specified in that location. It is similar to #include of C. When the path you specified is relative, then Bitbake loads the first file it finds in the BBPATH 'require' is another directive which is similar to 'include', but the major difference is that 'require' will throw an error when it doesn't find that file. You can see in the above screenshot: 1. I created a simple C Code 2. Used recipetool to create a base recipe for that code 3. Copied that recipe in the meta folder 4. Added 'include test.inc' in the test recipe and bitbake test did not gave any error 5. When adding 'require test.inc' in the test recipe, bitbake fails with error.

MACHINE_FEATURES vs DISTRO_FEATURES in Yocto

MACHINE_FEATURES: Specifies a list of hardware features the MACHINE is capable of supporting. Yocto ships with a list of machine features: keyboard : Hardware has a keyboard screen : Hardware has a screen serial : Hardware has serial support (usually RS232) touchscreen : Hardware has a touchscreen bluetooth : Hardware has integrated BT wifi : Hardware has integrated WiFi For all the features supported by Yocto, you can visit:  https://www.yoctoproject.org/docs/current/mega-manual/mega-manual.html#ref-features-machine So, if your machine has no wifi chip, you can remove 'wifi' from MACHINE_FEATURES MACHINE_FEATURES_remove = "wifi" DISTRO_FEATURES: Specifies the software support you want in your distribution for various features. DISTRO_FEATURES may influence how the recipes are configured and the packages are installed in images. List of Distro Features:  https://www.yoctoproject.org/docs/current/mega-manual/mega-manual.html#ref-features-distro For ...

Generate Build Statistics in Yocto

Image
Yocto build system allows you to collect build information per task and image. The data generated can be used to Identify areas of build times optimization, when new recipes are added to the system. To enable collection of build statistics, you need to inherit buildstats class by adding it to USER_CLASSES in your conf/local.conf or machine.conf By default the local.conf file generated by the oe-initbuild-env script will have the buildstats  in USER_CLASSES USER_CLASSES ?= "buildstats image-mklibs image-prelink" By default, the location of statistics is stored in build/tmp/buildstatistics  folder. You can change the location with BUILDSTATS_BASE variable. For each and every build, a new folder with the timestamp will be created in build/tmp/buildstatistics  Each folder contains: build_stats file:  host system information,  root filesystem location,  root filesystem size,  build time Average CPU Usage

PREFERRED_PROVIDER and PREFERRED_VERSION in Yocto

Image
When we run "bitbake <target>", bitbake looks at the PROVIDES variable of each recipe to find out the recipe for the particular target. The Default value of PROVIDES is PN. PN --> Name of the Recipe PV --> Version of the Recipe PR --> Revision of the Recipe PREFERRED_PROVIDER: Sometimes a target can have multiple providers. PREFERRED_PROVIDER determines which recipe should be given preference when multiple recipes provide the same item. E.g. virtual/kernel, u-boot will be provided by multiple recipes PREFERRED_PROVIDER_virtual/kernel = "linux-imx" PREFERRED_PROVIDER_u-boot = "uboot-imx" This should be written in local.conf or machine.conf PREFERRED_VERSION: When multiple versions of  a recipe are available, this variable determines which recipe should be given preference. If we don't state the version, bitbake will pick up the highest version. E.g. PREFERRED_VERSION_linux-imx = "3.10.17-1.0.0" PREFERRED_VERSI...

Tracking changes to image contents in Yocto - buildhistory

Image
Yocto provides "buildhistory" to keep track of changes to the image.  To enable "buildhistory", need to add the following lines in the local.conf file. INHERIT += "buildhistory" BUILDHISTORY_COMMIT = "1" INHERIT method includes the buildhistory class hooks in the building process. BUILDHISTORY_COMMIT enables bitbake to create a new GIT Commit in the buildhistory process. During the first build with the above changes, "buildhistory" directory is created, which has the git repository inside it. You can see I have added the above lines to the local.conf file and modified the core-image-minimal image to include 'usbutils' package. Now, to find out what all has changed, you can use the script provided by poky: 'buildhistory-diff' To use this script you need to have installed GitPython installed. If you get the following error: "Please install GitPython (python3-git) 0.3.4 or later in order to use this scr...

Conditional Metadaa in Yocto - OVERRIDES

Image
Bitbake provides a very way to write conditional metadata. It uses OVERRIDES variable to control what variables will be overridden after Bitbake parses recipes and configuration files. With OVERRIDES you can conditionally select a particular version of a variable and to conditionally prepend and append the value of variable. OVERRIDES variable contains value separated by colon character (:), and each value is an item we want to satisfy conditions. So, if you have a variable that is conditional on "x86", and "x86" is in OVERRIDES then x86 version will be used. You can see from the above screenshot, 'beaglebone-yocto' was present in OVERRIDES , so the default value of FOO ("bar") was overriden with FOO_beaglebone-yocto("hello") Now, I will change the MACHINE value to "qemux86", so instead of 'beaglebone-yocto' you will have 'qemux86' in OVERRIDES , and the value of 'FOO_qemux86' will be assi...

Appending and Prepending in Yocto - +=, =+ vs .=, =.

Image
Bitbake provides two sets of appending and prepending operators. 1. +=, =+ 2. .= , =. For example, A = "hello" A += "world" C = "good" C =+ "bye" The value of A will be "hello world" and C will be "bye good" So, += is appending and =+ is for prepending. Note, that these operators include an additional space between each call When we don't need to add space, we can use .=, =. operators. These are mainly used to concatenate strings. When we use append, prepend, there will be no additional space added, you need to manually provide space. You can also remove values from the variable using 'remove'.

Force user to change password change on first login

Image
We will use chage for this. chage utility allows us to change the password expiry date. To run 'chage -d0 root' after rootfs is created we will use 'ROOTFS_POSTPROCESS_COMMAND'. Modified core-image-minimal.bb  by adding a 'ROOTFS_POSTPROCESS_COMMAND' Flash the image on the Beaglebone black. On first boot, it will ask you for changing the password.

Steps to build and flash Yocto Image on Beaglebone black

Image
Step1: Create a folder for Yocto source code: $ mkdir beagblebone_yocto && cd beagblebone_yocto Step2: Clone the poky source code: $ git clone -b thud git://git.yoctoproject.org/poky.git Step3: Run the environment script to setup the Yocto Environment and create build directory $ source poky/oe-init-build-env build Step4: Set the MACHINE variable to 'beaglebone-yocto' $ echo 'MACHINE = "beaglebone-yocto"' > conf/local.conf Step5: Build the core-image-minimal image $ bitbake core-image-minimal After a few hours, you will find the images will be present in beaglebone_yocto/build/tmp/deploy/images/beaglebone-yocto folder Step6: Take memory card and make two partitions using gparted: Partition1 : Size 100 MB, fat16 (boot flag) Partition2: Size > 2GB , ext4 Step7: Copy the files in the required partition. $ cd beaglebone_yocto/build/tmp/deploy/images/beaglebone-yocto  $ cp MLO-beaglebone-yocto /media/jamal/b...

Steps to download and build Yocto Image for Digikey ConnectCore 6UL SBC Express

1. Install the repo tool. sudo curl -o /usr/local/bin/repo http://commondatastorage.googleapis.com/git-repo-downloads/repo sudo chmod a+x /usr/local/bin/repo 2. Create an folder to download and build mkdir -p ~/digikey cd ~/digikey 3. Run the below command to download the sources repo init -u https://github.com/digi-embedded/dey-manifest.git -b rocko repo sync -j8 --no-repo-verify 4. Initialize the environment by running the following command: source ~/digikey/mkproject.sh -p ccimx6ulstarter Accept the EULA 5. Build Image bitbake core-image-base

Adding build information in target Yocto

Image
"image-buildinfo" is a feature provided by Yocto. When you include this in the image, a new file '/etc/build' will be created. This file contains the following information: git commit ids of all the meta-xxx layers used in the image creation Distro Name and version

Modifying device tree in Yocto using recipetool

Image
Steps to modify device tree using recipetool: 1. Setup the environment by running oe-init-buildenv script 2. Run the following command to generate a recipe for devicetree using recipetool recipetool appendsrcfile -wm your-machine-name path/to/meta-mylayer virtual/kernel /path/to/your.dts 'arch/${ARCH}/boot/dts/your.dts' The above command will create a bbappend file with all the necessary information 3. If you are using a different name for device tree, then update the linux bbappend file with the new name KERNEL_DEVICETREE += "new_name.dtb"

bb.utils.contains yocto

Image
bb.utils.contains  is most commonly used function in Yocto. grep in poky directory returned with 696 count. $ grep -nr 'bb.utils.contains' poky/ | wc -l 696 It's definition is present in 'poky/bitbake/lib/bb/utils.py' file This function returns third argument if the second argument is subset of the first argument else returns fourth argument Let's take an example to understand this. You can see from the above screenshot, when the second argument is a subset of first argument, "present" was returned, else "notpresent" was returned We can also use bb.utils.contains inside if loop. This we can use inside a recipe. if ${@bb.utils.contains('SOMEFLAG','NEWVALUE3','true','false',d)}; then     FOO = 'HELLO' fi

Run Commands only on first boot in Yocto

If you have a requirement of executing a particular command only when the system is booting first time, you can use 'pkg_postinst_ontarget_${PN} ()' function and add your commands in this. This will create a script file with the commands you given in the above function and that script will be executed by init subsystem and after execution, script will be deleted. I have used this to provide POSIX capabilities to my particular binary. To add POSIX Capabilities, I added the following in my recipe: RDEPENDS_${PN} = "libcap libcap-bin" pkg_postinst_ontarget_${PN}() { setcap cap_dac_override,cap_sys_admin,cap_sys_boot,cap_fowner+ep $D/${bindir}/<mybinary> } The above changes will make the init system to execute the setcap command only once.

Run commands after rootfs creation in Yocto

Image
With ROOTFS_POSTPROCESS_COMMAND, you can run post processing commands, after the build system has created the root file system. Say for example, I need to create a new directory in the root file system home folder. Steps: 1. Create a .bbappend file of your image which you are generated E.g. if you are generating core-image-base.bb, create core-image-base.bbappend file 2. Add a function similar to the below screenshot IMAGE_ROOTFS : Variable containing the path of the root file system while it is in construction. 3. Now build the image, using bitbake bitbake core-image-base

Create a bbappend file using recipetool in Yocto

Image
In our previous post, we have seen how to create a base recipe using recipetool . recipetool also allows us to create/update a bbappend file to add or replace a source file. Now in our previous post related to dropbear, we wanted to add arguments to the init script to avoid root login over SSH, we did the following steps manually create a 'recipes-core/dropbear' folder in your layer Copied the original init file and modified it according to our requirement and copied it in 'files' folder Create a .bbappend file to use the new 'init' With recipetool you can avoid this manual process. You can see in the below screenshot, how easy it is to create a bbappend file using 'recipetool appendsrcfile' command

Yocto recipetool tutorial

Image
There are two ways of writing a recipe: 1. Writing from scratch 2.  Using recipetool to create a recipe for us We will see in this post on how to create a base recipe using recipetool Syntax for recipetool for local source: recipetool create source Let's try to pass a simple hello.c file to recipetool and observe the output. Note: Yocto environment script should be run, for us to use recipetool The recipetool command created 'hello.bb' with the following information added in the recipe: LICENSE = "CLOSED" SRC_URI Empty configure(), compile(), install() tasks. We can pass 'o' option to change the name of generated recipe $ recipetool create -o test_recipe.bb hello.c When given a tar file, it added CHKSUM as well as any inherits. It added a 'DEPENDS' variable, when passed dropbear tarball

Steps to build out of tree kernel modules using Yocto SDK

Image
One of the good feature of Yocto is SDK, it provides application team/developers to concentrate on their application and platform team to concentrate on image customizations. To provide SDK with the kernel source, you need to add the following in your local.conf/machine.conf file TOOLCHAIN_TARGET_TASK_append = " kernel-devsrc" This will include the Kernel Source code in the SDK. Generate SDK after adding the above configuration using the following command. bitbake -c populate_sdk core-image-sato SDK will be present in 'build/tmp/deploy/sdk' folder. Install this SDK on the machine where you want to build kernel modules. Steps to use this SDK to build out of tree kernel modules: 1. Source the environment file for your SDK 2. cd to <SDKInstallPath>/sysroots/<mach>/usr/src/kernel and run 'make modules_prepare' 3. Now to compile the hello world or any other module. KERNEL_SRC=<SDKInstallPath>/sysroots/<mach>/usr/src/kernel ...

Disabling root SSH login over network in Yocto

Image
One of the security measures we can take in our Yocto Image is to avoid root user login over SSH. The SSH server which gets installed on the image with core-image-sato is 'dropbear' To avoid root login over SSH, you need to remove 'debug-tweaks' EXTRA_IMAGE_FEATURES="" With 'debug-tweaks' option enabled, Yocto runs with dropbear with -B option. -B Allow blank password logins To avoid root login over SSH, we need to pass the following options to dropbear -w Disallow root logins -g Disable password logins for root dropbear recipe is present in 'poky/meta/recipes-core/dropbear/'. The 'init' file present in dropbear folder is the script which runs on boot. We need to add '-wg' option in DROPBEAR_EXTRA_ARGS To achieve this: 1. Create recipes-core folder if it doesn't exist in your layer 2. Inside that create dropbear folder 3. In it create files folder 4. Copy the original init file a...

Setting password for root user in Yocto

Image
By default, if you have not made any modifications to 'EXTRA_IMAGE_FEATURES' variables, "debug-tweaks" option is set. $ bitbake -e rpi-basic-image | grep ^EXTRA_IMAGE_FEATURES EXTRA_IMAGE_FEATURES="debug-tweaks" This option makes the image suitable for development and allows you to have an empty root password. So, if you have ssh server running, you no need to type the password. But for production, this is not a good idea, as it is insecure. We need to add a password for the root user. We need to remove "debug-tweaks" option from the EXTRA_IMAGE_FEATURES. Add the below line in your local.conf or machine.conf file EXTRA_IMAGE_FEATURES="" To add the password for the root account you can write the below in your local.conf or machine.conf file: INHERIT += "extrausers" EXTRA_USERS_PARAMS = "usermod -p $(openssl passwd 123456) root The problem with the above approach is any developer can look at th...