Posts

Showing posts from April, 2019

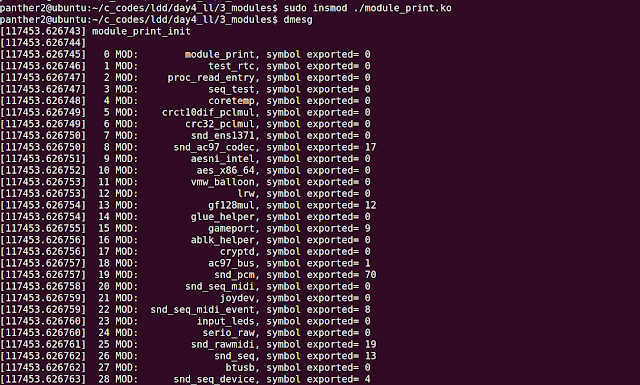
Linux Driver Code to print machine name, system name, release and Version

Image
init_uts_ns(init/version.c) variable in Linux Kernel contains the information about: Operating system name (e.g., "Linux") Operating system release (e.g., "2.6.28") Operating system version Hardware identifier When you run 'uname' command from user space, values from above structure are retrieved. Code Output:

Linux Device Driver Code to print all the loaded modules along with number of exported symbols

Image
Kernel module in Linux is represented by 'struct module' The module structure is defined in <linux/module.h> struct module {     enum module_state state;     /* Member of list of modules */     struct list_head list;     /* Unique handle for this module */     char name[MODULE_NAME_LEN];     .....     unsigned int num_syms;     .... }; The above structure has a linked list embedded in it, through which we can traverse to all the modules present in it Code: Output:

Print the module load time in Linux Device Driver while unloading

Image
In Linux Kernel, the number of timer interrupts per second is defined by 'HZ' variable. You can get the value of HZ Variable by running the following command. grep 'CONFIG_HZ=' /boot/config-$(uname -r) For example, if the value is 250, it means there will be 250 timer interrupts per second. Linux kernel maintains a global variable 'jiffies' which will be incremented for every timer interrupt. So, for every second, it will be incremented by HZ. Header File: #include <linux/jiffies.h> extern unsigned long volatile jiffies; HZ = (number of ticks)/sec jiffies = number of ticks To convert from seconds to unit jiffies: HZ * jiffies Convert from jiffies to seconds: jiffies/HZ Code to measure the Driver Load Time: Output:

KBUILD_EXTRA_SYMBOLS - Using Symbols exported from external module

Image
Consider a scenario where you have a symbol (variable/function) present in one external module and you want to use it in your another external module and the source code of these modules is not built by single Makefile, then even you export the symbol from first module, when you are building the second module, it will throw Warning saying that the exported symbol is not found. The above screenshot shows the module1 code which is exporting a variable 'my_class' kbuild needs  to have full knowledge of all symbols to avoid spitting out warnings about undefined symbols. When an external module is built, a Module.symvers file is generated containing all exported symbols which are not defined in the kernel. Use KBUILD_EXTRA_SYMBOLS and provide it the path of the Module.symvers file if it is present in some other directory other than the module directory. To resolve this, use KBUILD_EXTRA_SYMBOLS in the Makefile, add the following:  KBUILD_EXTRA_SYMBOLS := /home/

Change the name of module without changing the name of source file

Image
Suppose, you have a simple module file with name 'hello.c', you will write a Makefile without the following: obj-m := hello.o And it will create a hello.ko for you on running "make" command. What if you want the name as 'linux.ko' and don't want to rename the 'hello.c' to 'linux.c'. You need to update the Makefile using 'filename'-objs, for example to get 'linux.ko' from 'hello.c' file, the Makefile should be : Output:

Get name of kernel module in Driver Code - KBUILD_MODNAME

Image
Kernel build system defines KBUILD_MODNAME automatically from each Makefile. Following is the sample code which prints the name of module when loaded and unloaded. Ouptut:

THIS_MODULE in Linux Device Drivers

Image
What is THIS_MODULE? Whenever you create a kernel module, the kernel's build machinery generates a struct module object for you, and makes THIS_MODULE point to it. This struct contains many fields, some of which can be set with module macros such as MODULE_VERSION. You can see from the definition of THIS_MODULE macro that it is referring to '__this_module'. This is defined when we build the module file by running 'make' Let's write a sample module which prints the module name and version using THIS_MODULE. Output: You can see from the above screenshot, after running "make", it generated temporary files as well as the module(.ko). The *.mod.c file has struct module __this_module defined.

include vs require in yocto

Image
Bitbake allows sharing metadata using include files (.inc) and class files(.bbclass) The include files contains: 1. Definition of Paths 2. Custom tasks used by multiple recipes Whenever bitbake parses the 'include' directive, it will include the file you specified in that location. It is similar to #include of C. When the path you specified is relative, then Bitbake loads the first file it finds in the BBPATH 'require' is another directive which is similar to 'include', but the major difference is that 'require' will throw an error when it doesn't find that file. You can see in the above screenshot: 1. I created a simple C Code 2. Used recipetool to create a base recipe for that code 3. Copied that recipe in the meta folder 4. Added 'include test.inc' in the test recipe and bitbake test did not gave any error 5. When adding 'require test.inc' in the test recipe, bitbake fails with error.

MACHINE_FEATURES vs DISTRO_FEATURES in Yocto

MACHINE_FEATURES: Specifies a list of hardware features the MACHINE is capable of supporting. Yocto ships with a list of machine features: keyboard : Hardware has a keyboard screen : Hardware has a screen serial : Hardware has serial support (usually RS232) touchscreen : Hardware has a touchscreen bluetooth : Hardware has integrated BT wifi : Hardware has integrated WiFi For all the features supported by Yocto, you can visit:  https://www.yoctoproject.org/docs/current/mega-manual/mega-manual.html#ref-features-machine So, if your machine has no wifi chip, you can remove 'wifi' from MACHINE_FEATURES MACHINE_FEATURES_remove = "wifi" DISTRO_FEATURES: Specifies the software support you want in your distribution for various features. DISTRO_FEATURES may influence how the recipes are configured and the packages are installed in images. List of Distro Features:  https://www.yoctoproject.org/docs/current/mega-manual/mega-manual.html#ref-features-distro For

Linux chage command - Change Age

Image
chage stands for 'change age'. This command is used to change user password expiry information. Syntax: chage [options] LOGIN Examples: 1. List the password aging information of a particular user: $chage -l <username> From the above output, you can observe that the password expiration is disabled for this user. 2.  Change password expiry date: Use -M option to change the password expiry date, it accepts the number of days after which password will expire. You can use -m option which is the minimum number of days between password change. A value of zero means the user can change the password at any date. 3. Change last password change date: Use the -d option to change the last password change date. You can pass a number to this option or complete date 4. Disable Password aging for a particular user: chage -I -1 -m 0 -M 99999 -E -1 <username> -I --> Inactive -m --> Minimum number of days -M -->

Generate Build Statistics in Yocto

Image
Yocto build system allows you to collect build information per task and image. The data generated can be used to Identify areas of build times optimization, when new recipes are added to the system. To enable collection of build statistics, you need to inherit buildstats class by adding it to USER_CLASSES in your conf/local.conf or machine.conf By default the local.conf file generated by the oe-initbuild-env script will have the buildstats  in USER_CLASSES USER_CLASSES ?= "buildstats image-mklibs image-prelink" By default, the location of statistics is stored in build/tmp/buildstatistics  folder. You can change the location with BUILDSTATS_BASE variable. For each and every build, a new folder with the timestamp will be created in build/tmp/buildstatistics  Each folder contains: build_stats file:  host system information,  root filesystem location,  root filesystem size,  build time Average CPU Usage

PREFERRED_PROVIDER and PREFERRED_VERSION in Yocto

Image
When we run "bitbake <target>", bitbake looks at the PROVIDES variable of each recipe to find out the recipe for the particular target. The Default value of PROVIDES is PN. PN --> Name of the Recipe PV --> Version of the Recipe PR --> Revision of the Recipe PREFERRED_PROVIDER: Sometimes a target can have multiple providers. PREFERRED_PROVIDER determines which recipe should be given preference when multiple recipes provide the same item. E.g. virtual/kernel, u-boot will be provided by multiple recipes PREFERRED_PROVIDER_virtual/kernel = "linux-imx" PREFERRED_PROVIDER_u-boot = "uboot-imx" This should be written in local.conf or machine.conf PREFERRED_VERSION: When multiple versions of  a recipe are available, this variable determines which recipe should be given preference. If we don't state the version, bitbake will pick up the highest version. E.g. PREFERRED_VERSION_linux-imx = "3.10.17-1.0.0" PREFERRED_VERSI

Tracking changes to image contents in Yocto - buildhistory

Image
Yocto provides "buildhistory" to keep track of changes to the image.  To enable "buildhistory", need to add the following lines in the local.conf file. INHERIT += "buildhistory" BUILDHISTORY_COMMIT = "1" INHERIT method includes the buildhistory class hooks in the building process. BUILDHISTORY_COMMIT enables bitbake to create a new GIT Commit in the buildhistory process. During the first build with the above changes, "buildhistory" directory is created, which has the git repository inside it. You can see I have added the above lines to the local.conf file and modified the core-image-minimal image to include 'usbutils' package. Now, to find out what all has changed, you can use the script provided by poky: 'buildhistory-diff' To use this script you need to have installed GitPython installed. If you get the following error: "Please install GitPython (python3-git) 0.3.4 or later in order to use this scr

Conditional Metadaa in Yocto - OVERRIDES

Image
Bitbake provides a very way to write conditional metadata. It uses OVERRIDES variable to control what variables will be overridden after Bitbake parses recipes and configuration files. With OVERRIDES you can conditionally select a particular version of a variable and to conditionally prepend and append the value of variable. OVERRIDES variable contains value separated by colon character (:), and each value is an item we want to satisfy conditions. So, if you have a variable that is conditional on "x86", and "x86" is in OVERRIDES then x86 version will be used. You can see from the above screenshot, 'beaglebone-yocto' was present in OVERRIDES , so the default value of FOO ("bar") was overriden with FOO_beaglebone-yocto("hello") Now, I will change the MACHINE value to "qemux86", so instead of 'beaglebone-yocto' you will have 'qemux86' in OVERRIDES , and the value of 'FOO_qemux86' will be assi

Appending and Prepending in Yocto - +=, =+ vs .=, =.

Image
Bitbake provides two sets of appending and prepending operators. 1. +=, =+ 2. .= , =. For example, A = "hello" A += "world" C = "good" C =+ "bye" The value of A will be "hello world" and C will be "bye good" So, += is appending and =+ is for prepending. Note, that these operators include an additional space between each call When we don't need to add space, we can use .=, =. operators. These are mainly used to concatenate strings. When we use append, prepend, there will be no additional space added, you need to manually provide space. You can also remove values from the variable using 'remove'.

Force user to change password change on first login

Image
We will use chage for this. chage utility allows us to change the password expiry date. To run 'chage -d0 root' after rootfs is created we will use 'ROOTFS_POSTPROCESS_COMMAND'. Modified core-image-minimal.bb  by adding a 'ROOTFS_POSTPROCESS_COMMAND' Flash the image on the Beaglebone black. On first boot, it will ask you for changing the password.

Steps to build and flash Yocto Image on Beaglebone black

Image
Step1: Create a folder for Yocto source code: $ mkdir beagblebone_yocto && cd beagblebone_yocto Step2: Clone the poky source code: $ git clone -b thud git://git.yoctoproject.org/poky.git Step3: Run the environment script to setup the Yocto Environment and create build directory $ source poky/oe-init-build-env build Step4: Set the MACHINE variable to 'beaglebone-yocto' $ echo 'MACHINE = "beaglebone-yocto"' > conf/local.conf Step5: Build the core-image-minimal image $ bitbake core-image-minimal After a few hours, you will find the images will be present in beaglebone_yocto/build/tmp/deploy/images/beaglebone-yocto folder Step6: Take memory card and make two partitions using gparted: Partition1 : Size 100 MB, fat16 (boot flag) Partition2: Size > 2GB , ext4 Step7: Copy the files in the required partition. $ cd beaglebone_yocto/build/tmp/deploy/images/beaglebone-yocto  $ cp MLO-beaglebone-yocto /media/jamal/boot

Restart and shutdown from Linux Kernel Driver

Image
Linux kernel provides functions which allows us to restart or shutdown from the kernel driver. Header File: <linux/reboot.h> kernel_power_off -> To shutdown kernel_restart(char *msg) -> To restart the system

Learning USB HID in Linux Part 7 - Understanding Keyboard Report Descriptors and Reports

Image
The below is the Report Descriptor of USB Keyboard connected to my system: usbhid-dump -d 413c:2107 | tail -n +2 | xxd -r -p | hidrd-convert -o spec Usage Page (Desktop),               ; Generic desktop controls (01h) Usage (Keyboard),                   ; Keyboard (06h, application collection) Collection (Application),     Usage Page (Keyboard),          ; Keyboard/keypad (07h)     Usage Minimum (KB Leftcontrol), ; Keyboard left control (E0h, dynamic value)     Usage Maximum (KB Right GUI),   ; Keyboard right GUI (E7h, dynamic value)     Logical Minimum (0),     Logical Maximum (1),     Report Size (1),     Report Count (8),     Input (Variable),     Report Count (1),     Report Size (8),     Input (Constant),     Report Count (5),     Report Size (1),     Usage Page (LED),               ; LEDs (08h)     Usage Minimum (01h),     Usage Maximum (05h),     Output (Variable),     Report Count (1),     Report Size (3),     Output (Constant),     Report Count (6),

Learning USB HID in Linux Part 5 - Collections, Usage Maximum, Usage Minimum, Logical Maximum, Logical Minimum

Image
Collections Report descriptors are made up of items; an item is distinct grouping of data. Collection items are used to group together input, output and feature items. In the HID Specification, there are 3 different types of predefined collections: Physical Application Logical Physical: Data collected at one physical point. Devices that collect data from multiple sensors at one time may group the data in physical collection Eg. Mouse position Data. Application: Groups together items that serves different or common purposes in a single device.  Eg. Keyboard that groups together the LEDs and key presses. Usually, every Report Descriptor must define at least one Application Collection but you may have two or more. Logical: Indicates that some bits of data belong together, whatever that means. Example from HID Spec: Contents of data buffer and buffer length Usage Minimum and Usage Maximum assigns a series of Usage IDs to the data in the array or bitmap. Usage Mi

Learning USB HID in Linux Part 6 - Understanding Mouse Report Descriptor and reports

Image
jamal@ubuntu:~/hidrd$ sudo usbhid-dump -d 0458:003a | tail -n +2 | xxd -r -p | hidrd-convert -o spec Usage Page (Desktop),               ; Generic desktop controls (01h) Usage (Mouse),                      ; Mouse (02h, application collection) Collection (Application),     Usage Page (Button),            ; Button (09h)     Usage Minimum (01h),     Usage Maximum (03h),     Logical Minimum (0),     Logical Maximum (1),     Report Count (3),     Report Size (1),     Input (Variable),     Report Count (1),     Report Size (5),     Input (Constant, Variable),     Usage Page (Desktop),           ; Generic desktop controls (01h)     Usage (Pointer),                ; Pointer (01h, physical collection)     Collection (Physical),         Usage (X),                  ; X (30h, dynamic value)         Usage (Y),                  ; Y (31h, dynamic value)         Logical Minimum (-127),         Logical Maximum (127),         Report Size (8),         Report Count (2),        

Learning USB Hid in Linux Part 4 - Usage Page, Usages, Report Size and Report Count

Report Descriptor defines the format and use of the data in the HID's report. Report descriptor needs to be flexible enough to handle devices with different purposes. Data should use a concise format to keep from wasting storage space in the device or bus time when the data transmit. HID Report descriptors achieve both goals by using a format that's more complex and less readable than a more verbose format might be. A usage provides information to an application developer about the intended meaning and use of a particular item described in the Report Descriptor. HID Usages are organized into usage pages of related control.  A usage page value is an unsigned 16-bit value. Eg: Generic Desktop Control, Game Controls, LEDs, Buttons etc In the context of usage page, usage id indicates a usage in the usage page. A value of zero is reserved. A Usage ID is an unsigned 16-bit value. The combination of Usage page and Usage ID uniquely identifies a specific Usage in the Usage

Learning USB HID in Linux Part 3 - Printing reports using usbhid-dump

Image
usbhid-dump is a USB HID Dumping utility based on libusb-1.0. It dumps Report Descriptors Reports Print Report descriptors using usbhid-dump:   You can see from the above output, the report descriptor is printed in hexadecimal form. To dump report descriptor in human readable form, you can use hidrd-convert utility along with usbhid-dump. hidrd-convert utility doesn't come by default on Ubuntu, You need to manually install it. Steps to install hidrd-convert: 1.  sudo apt-get install autoconf 2.  sudo apt-get install libtool 3. git clone https://github.com/DIGImend/hidrd 4. cd hidrd 5. ./bootstrap 6. ./configure 7. make 8. sudo make install 9. sudo ldconfig Print report descriptors in human readable format using hidrd-convert:   Printing reports using usbhid-dump:     Syntax: sudo usbhid-dump -d <vid>:<pid> -e all Move the mouse or click buttons you will see lot of reports being received.

Learning USB HID in Linux Part 2 - Print Report Descriptors

Image
I have connected a mouse over USB to my Ubuntu Linux machine lsusb is command which comes with usbutils package To find out the Report Descriptors, run lsusb -vd <vid>:<pid> In my case:  $lsusb -vd 0458:003a If you get error like "Report Descriptors unavailable" as shown below Run the command as root: $sudo lsusb -vd 0458:003a

Learning USB HID in Linux Part 1 - Basics

What is HID? HID stands for Human Interface Device. From Wikipedia: "HID is a device used by humans which takes input from humans and gives output to humans" Examples: Joysticks, Mouse, Keyboard, Barcode Readers, volume controls on speakers/headsets Why was HID Created? Replacement of PS/2 Creating interface over USB and to have a generic driver for HID devices like keyboard, mice and game controllers.  Components of HID? Device: Interacts directly with human such as mouse, keyboard Host: Communicates with device and receives input data from the device on actions performed by the human. Output data flows from host to device and then to human HID was originally defined to use over USB, but now used with other transport layers like 1. Bluetooth HID 2. HID over I2C 3. HOGP (HID over GATT Protocol) We will be discussing mainly in this series on USB HID.  HID Terminology Reports: Communication in HID Happens using "Reports". Repor