Building Yocto Image for Raspberry Pi
The current stable branch of Yocto is Thud. Following are the steps for generating image for Raspberry Pi3 for Thud Branch.
Step1: Clone the Poky Layer (Thud branch)
$ git clone -b thud git://git.yoctoproject.org/poky.git


Step1: Clone the Poky Layer (Thud branch)
$ git clone -b thud git://git.yoctoproject.org/poky.git
Step2: Clone the meta-openembedded Layer (Thud branch), as it is one of the dependencies mentioned in https://git.yoctoproject.org/cgit.cgi/meta-raspberrypi/about/
$ git clone -b thud git://git.openembedded.org/meta-openembedded
Step3: Clone the Raspberry-Pi BSP Layer: meta-raspberrypi (Thud branch)
$ git clone -b thud git://git.yoctoproject.org/meta-raspberrypi
Step4: Once you complete cloning, there should be three folders: poky, meta-openembedded, meta-raspberrypi
Step5: Run the environment script to setup the Yocto Environment and create build directory ("raspi-build")
$ source poky/oe-init-build-env raspi-build
Step6: Add meta-openembedded layers ( meta-oe, meta-multimedia, meta-networking, meta-python) and meta-raspberrypi layer to bblayers.conf

Step7: Set the MACHINE in local.conf to "raspberrypi3".
$ echo 'MACHINE = "raspberrypi3"' >> conf/local.conf
Step 8:
Final step is to build the image. To find out the available images:
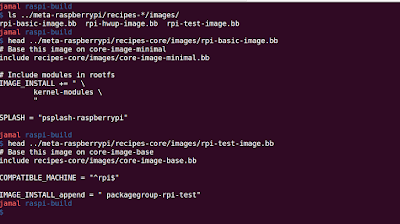
$ ls ../meta-raspberrypi/recipes-*/images/

Step9: Let's build the "rpi-basic-image" by running "bitbake rpi-basic-image" command
Step 10: Write the image on to the sd card using the following command:
$ sudo dd if=tmp/deploy/images/raspberrypi3/rpi-basic-image-raspberrypi3.rpi-sdimg of=/dev/sdb bs=4M

You will see Yocto logo when you power up RPI with this image.


This comment has been removed by the author.
ReplyDeleteThis comment has been removed by the author.
ReplyDelete